 I've mostly been working at the bike shop lately, so I haven' t had a lot of time for making things, unfortunately. It's been a while since I've updated though, so there are a few new photos to show. These water squirting bikes were spruced up and brought out to the Spring Roll.  They were a hit! In spite of the fact that there was a big rainstorm that day anyway.  I finally remodeled the Bike Collective's utility trailer. It's been a much needed upgrade for many years, and finally bit the bullet on it. I knew it was going to be a lot of hours of work. Among the list were: - Add a lid to prevent vandalism and theft. Has to be lockable and easy to open. - Reinforce frame - Build a superstructure to mount side panels and to support lid. - Mount the spare tire. - Re-hinge tailgate. - Paint panels (done by the Collective staff and volunteers). - Improve lights. - Improve safety chain attachment. - Improve lockability. - Paint the frame of the trailer.   LEDs have made trailer lights much more compact and easier to protect.  Riveting is becoming a new favorite way of joining dissimilar metals. This big gun will do up to 1/4" steel pop rivets with an extra large head.  Unlike bolts, rivets expand into their holes upon installation, so there is less potential for movement. Both sides of the hole need to be deburred though, which can be a problem with thin tube, where there is often a large bur on the inside of the tube where it is hard to get. There are whirligig-style deburring tools that are made for this.  The lid weighs maybe 80lbs, despite being made of Aluminum and lightweight roofing panels. To offset this weight, they are supported by two high-force gas springs. The lid lifts up spontaneously when released, and can be pulled back down with a cord  This is a beehive lift for my dad. I kind of went overboard with the design. In retrospect, I think there would be a way to do it with an engine hoist and a specifically-made cradle. The reason for the lift is that he wants to add boxes near the bottom of the stack. Imagine placing a toilet on its wax seal in a cramped bathroom, except there are bees where you're trying to set it down and they're crawling all over you and there's noplace to grab that doesn't have bees crawling all over it. The hive lift allows the beekeeper to carefully control the vertical movement of the load.  This was the concept photo he sent me to design from. My version is disassemblable for storage, scaled up to work with any size hive, and it has leveling feet. I have since also added hand-truck style wheels for portability  My neighbor, Paul, bought Robnetts' pipe vise and asked me to build a receiver hitch mount for it so that he could mount it on the back of his truck. A moment of silence for Robnett's Hardware. I'm happy for Tori and Scott that they are out from under the burden, but damn it is a blow. The bike shop I work at is right across the street, and we are all still bummed about it. What a loss. Buy local, folks.  The part that inserts into the receiver has an expander wedge at the end that is welded to a threaded drawbar that gets pulled by the big handle nut on the left. That tightens the mount into the receiver, preventing slop.  The hub flange on the Farm Home's kinetic sculpture, "Kingfisher" broke. I suspect that they are go-kart hubs. The 1.7-meter wheels of the Kingfisher put a lot more load on the flanges than they were designed for. I added gussets between the studs.  The photo below is in fact relevant. This is a marching xylophone that I got on Ebay for $35. My plan is to make a "player xylophone" that can be driven by one of the bikes on the Flanger.  One of my favorite art pieces is Wintergatan's original marble machine. Go look it up if you're not familiar. There are a few different components that need design: - The "punch card" mechanism. - The auto-xylophone mechanism. - The bicycle-drive mechanism. I was hoping to have a demonstration piece ready for Open Streets this year, but the Summer really got away from me and I haven't had the chance. Now I've got a broken foot, so I will spend some down time on the design side. My idea, taken from Wintergatan, is to use Technics (a lego-brand offshoot with standardized parts for more mechanical assemblies) beams and pegs to create a "programming" wheel that can be laid out visually in beats and measures and can be easily programmed by moving the pegs. There are 30 keys on my xylophone. Since each note needs its own "channel", that means 30 peg-holes across. Then, I need to think about song structure. I don't know enough music theory to know how many measures I should design for on the programming wheel. I've heard of 12-bar chord progressions, but are those the most useful in music-box programming terms? I want to have the ability to play some really cool melodies. Like, not your usual cheesy ones.  Above is my array of technics components that I got. I'm going to have to keep Technics in mind for future projects. Not very heavy duty, but the standardization is amazing. And because they're made by the gajillions, they are a few cents per component. The different colors indicate measures, half notes, quarter notes etc. I think having a whole 'nother wheel for 3/4 rhythms would be good, eventually. Below is the innards of a Shimano Nexus 8-speed internally-geared hub. Just thought you would think it looked cool. I've never taken one apart beyond this point.  Since I am laid up with a broken foot currently, I've been able to catch up on a lot of little things I have wanted to do. Measuring disc brake rotors for wear is a bit of a tricky problem, because they don't wear evenly across the braking track, so you need a thickness-measuring device that has a probe instead of flat jaws. My coworker and fellow tool-nerd, Gabe has a really nice Mitutoyo digital micrometer with a ball anvil and spindle, but I prefer not to be using someone else's fragile measuring tools all the time. There are calipers made this purpose, but they are sort of a specialty item, so also kind of expensive. My solution was to buy a cheap set of digital calipers and glue flattened bearing balls to the jaws. Since it's digital, I can reset the zero to account for the balls.  My coworker asked me if I could make some cylindrical pry-bars for removing wiper seals from suspension forks. We weren't sure what size to make, so I cut my chunk of delrin in half and turned each end to a different diameter. The end faces are also concave, which you can't see in the photo  This grasshopper came to work with me by accident. Same with the dragonfly at the beginning of the post. 
0 Comments
 Guardrail screen for a tiny-house loft. 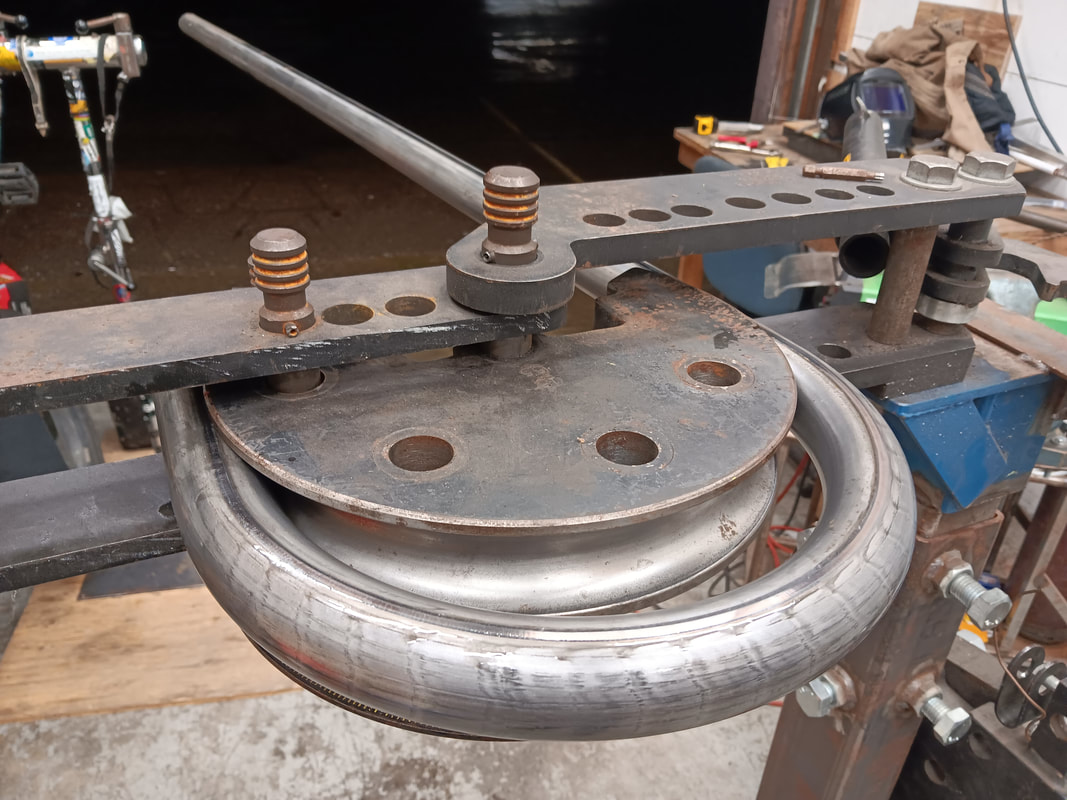 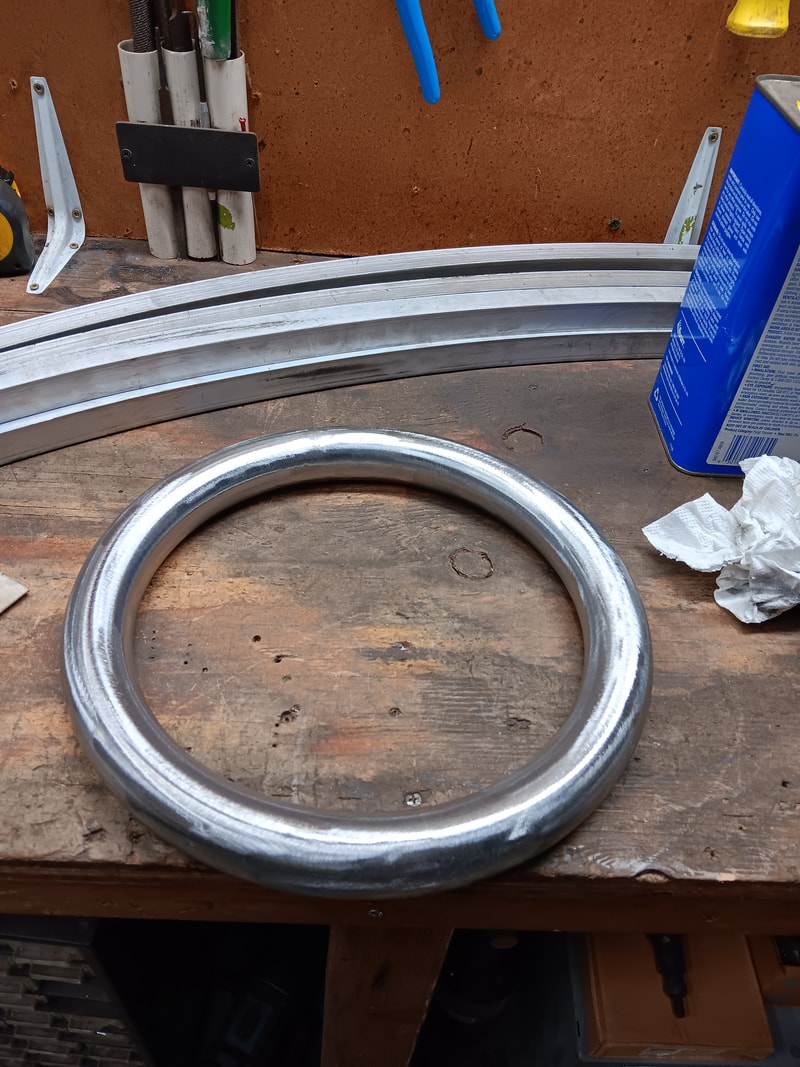 Torus of round tube made from two 180-degree bends welded together.  Finished product, painted with boiled linseed oil and powdered iron oxide.  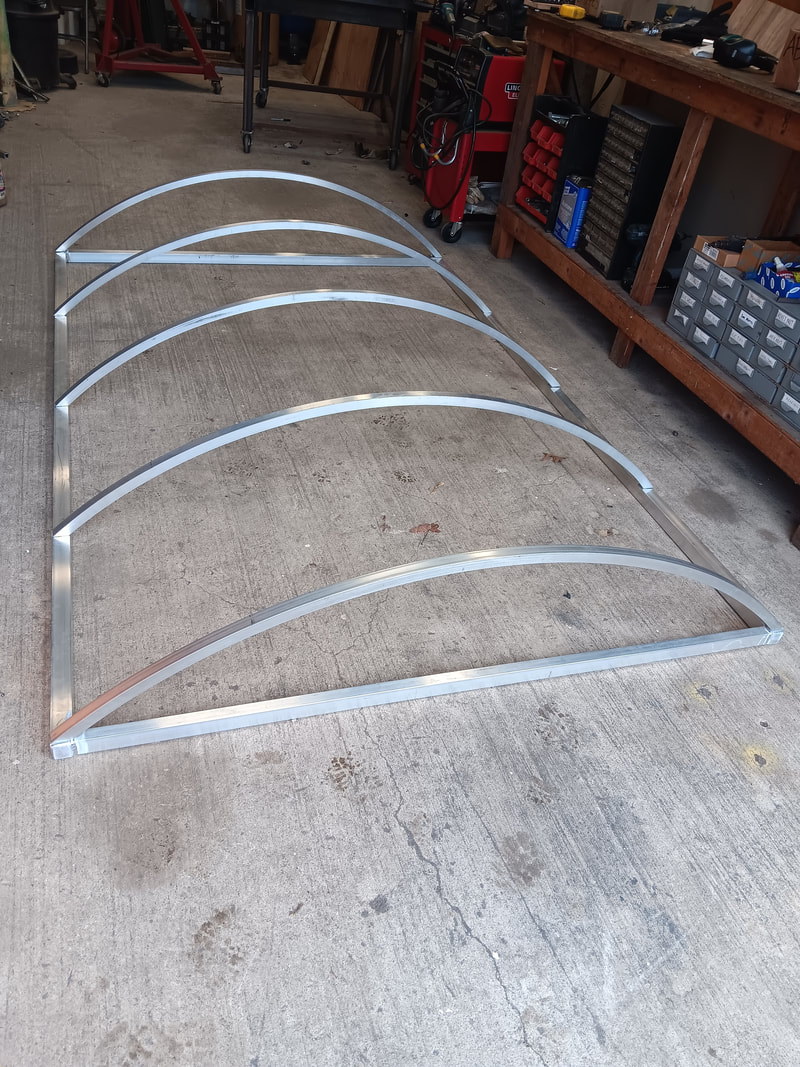 Aluminum roof for a utility trailer. 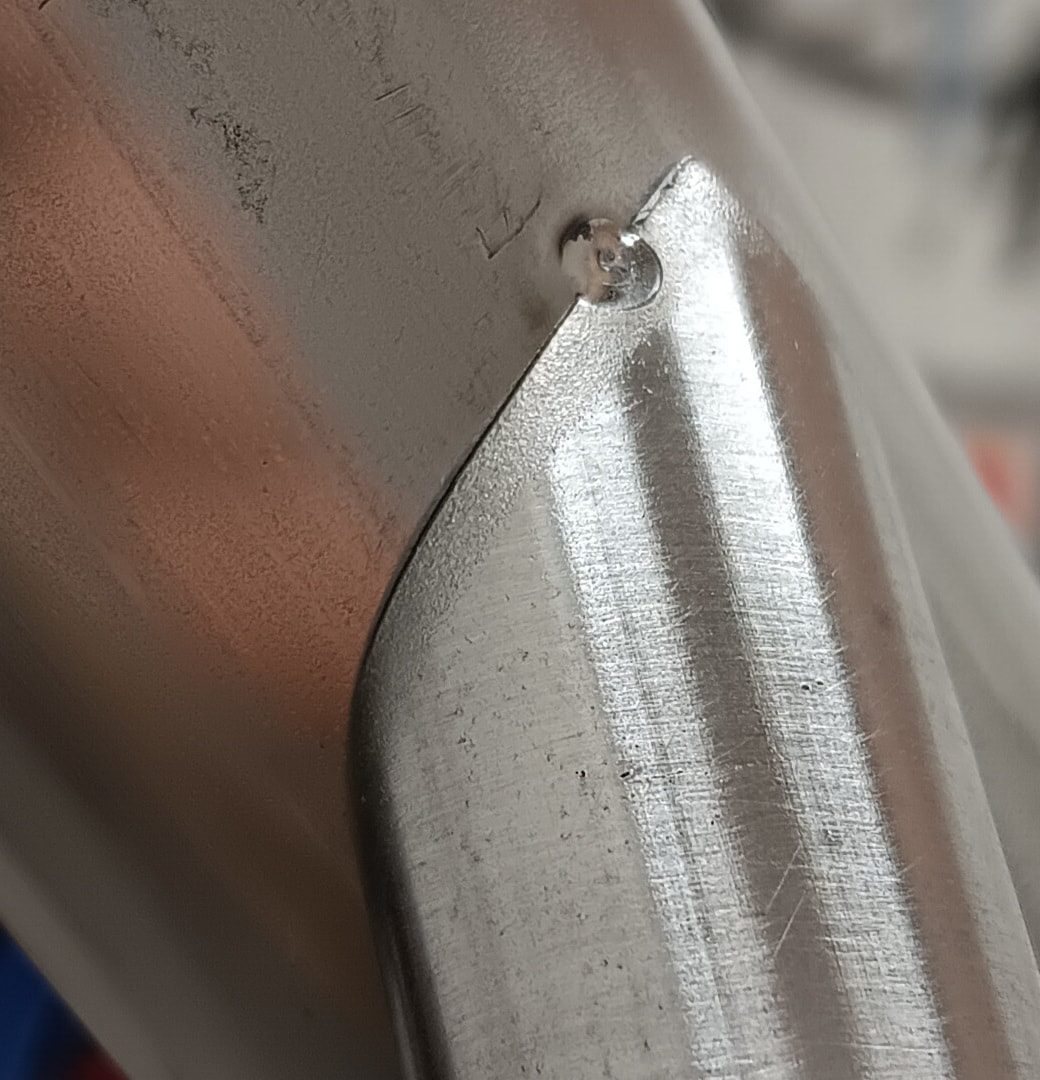 Accurate miters like this make tig welding a dream. Also makes for easy tacking. 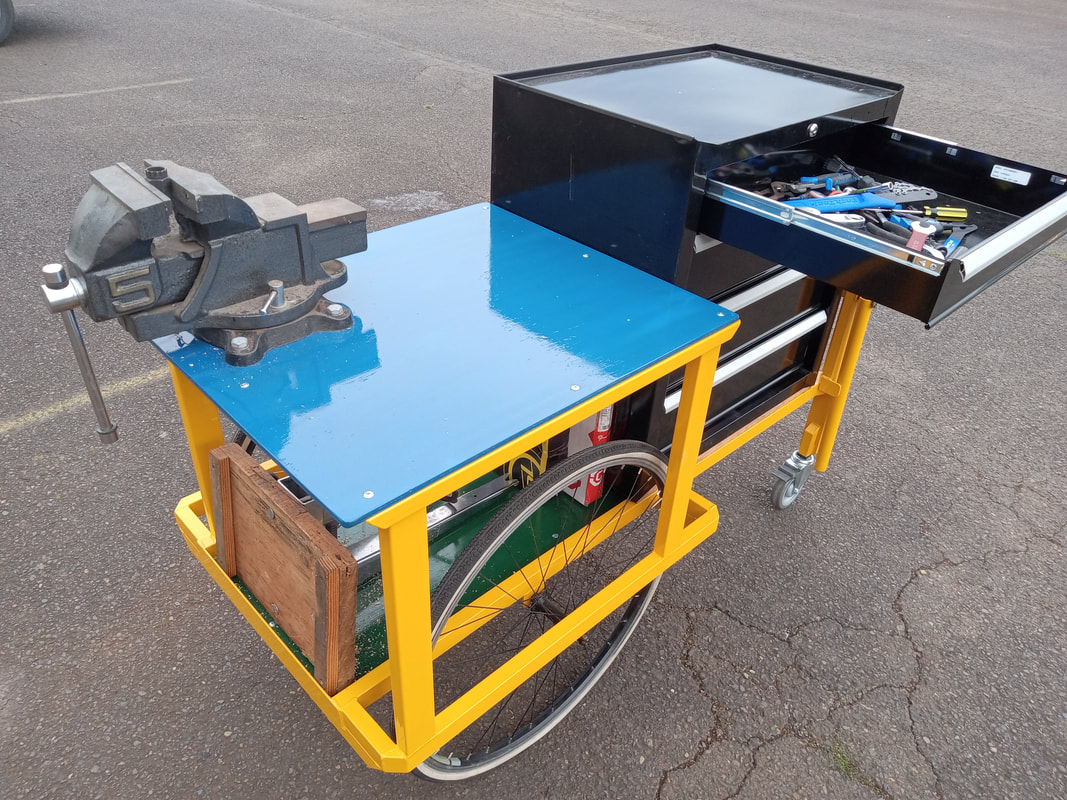 Also from several years ago now. Bike repair cart for the Farm Home.  Cantilever brake post replacement. 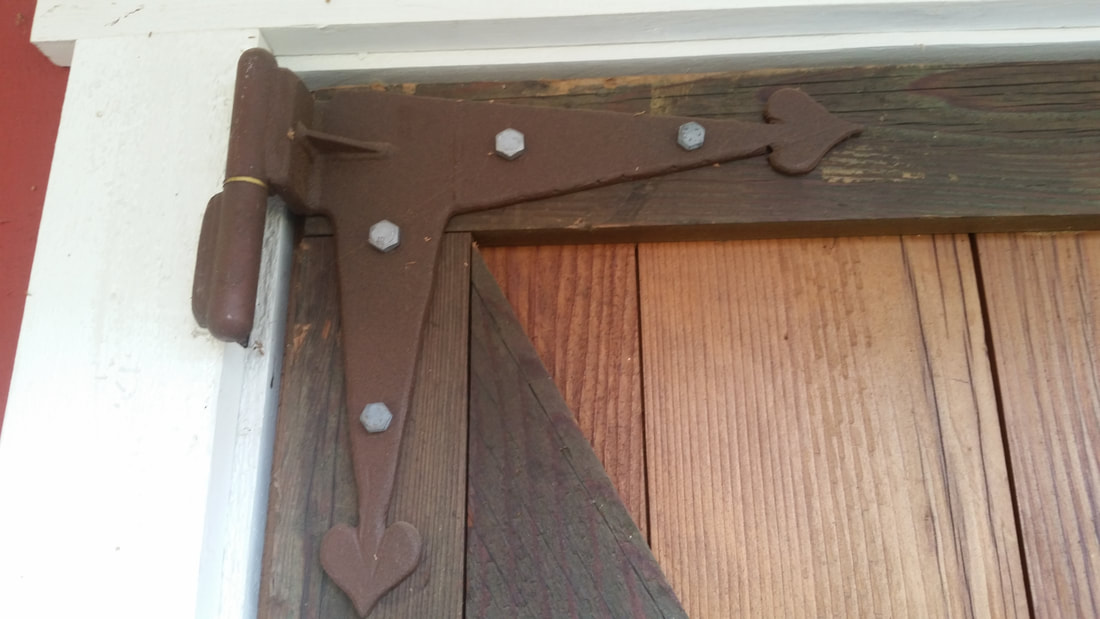 These hinges are from several years ago, actually. 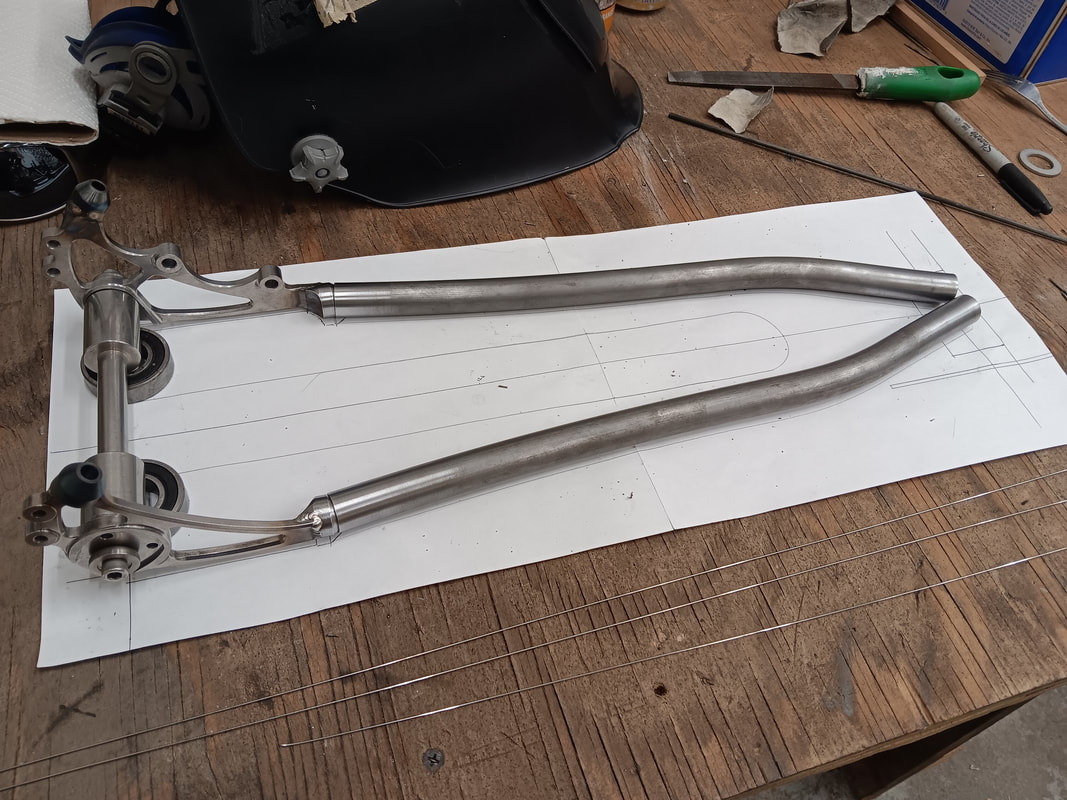 Laying out chainstays using a full-scale drawing. 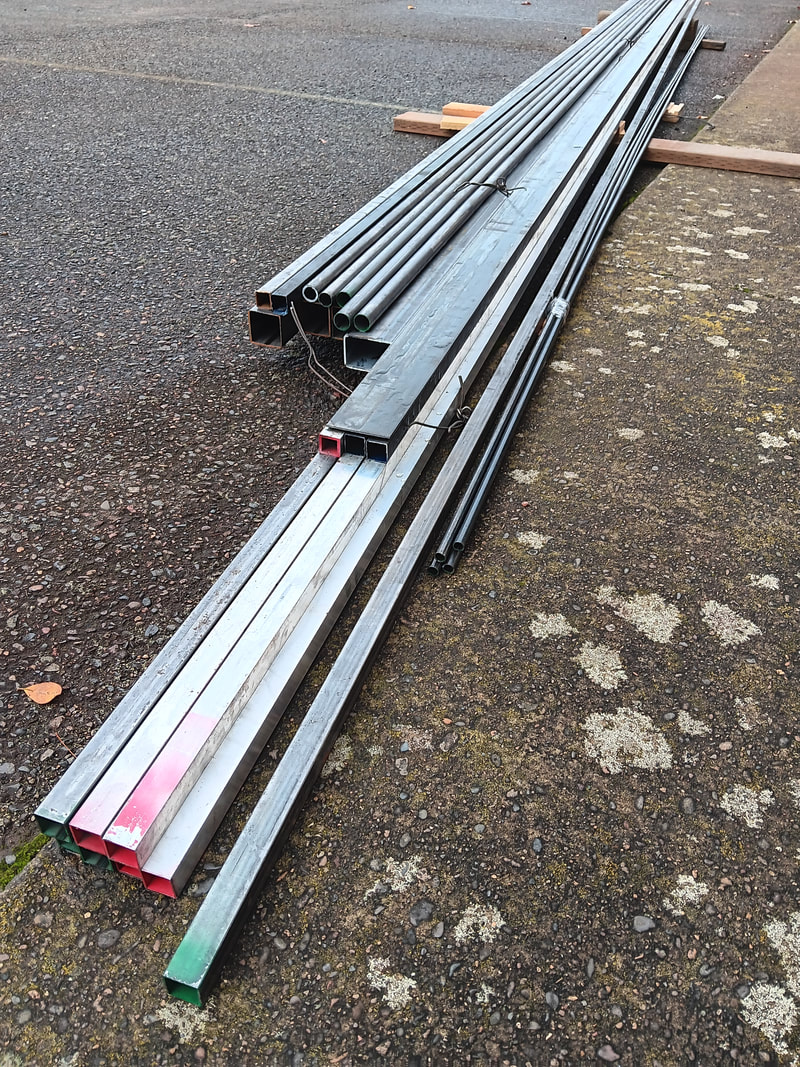 $765 worth of steel and aluminum tubing in various sizes. This is material for three different projects. 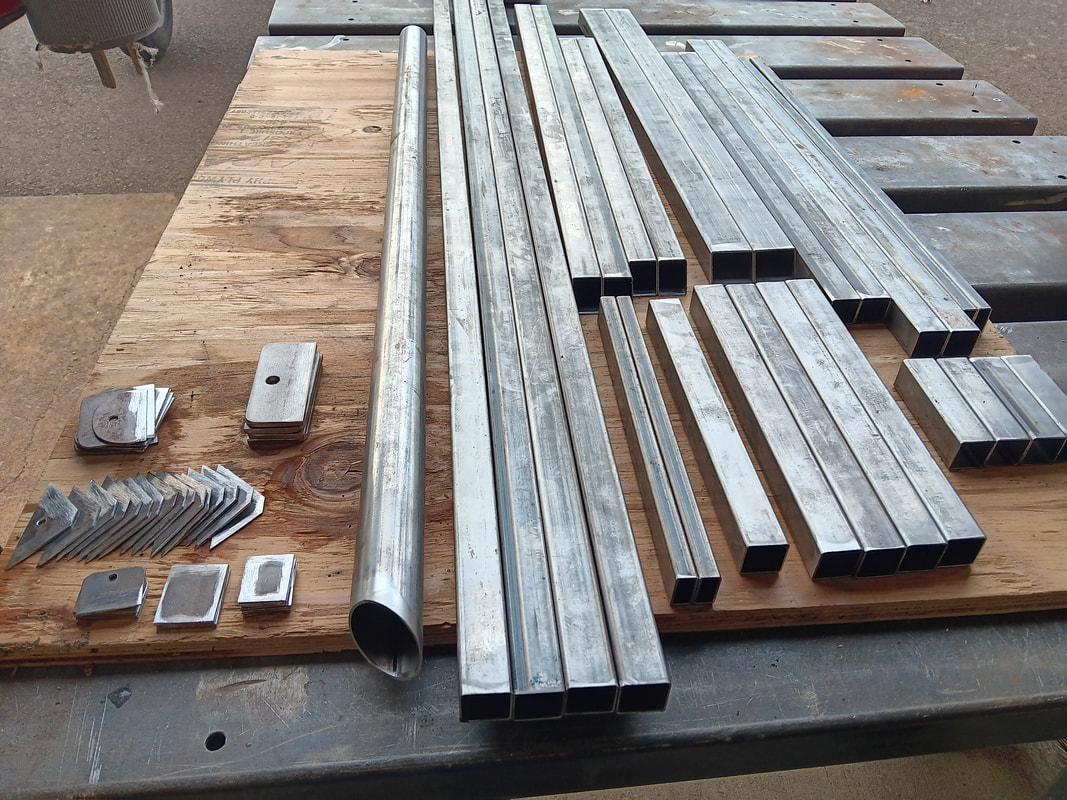 A bunch of pieces cut for a bike trailer for small farm use. 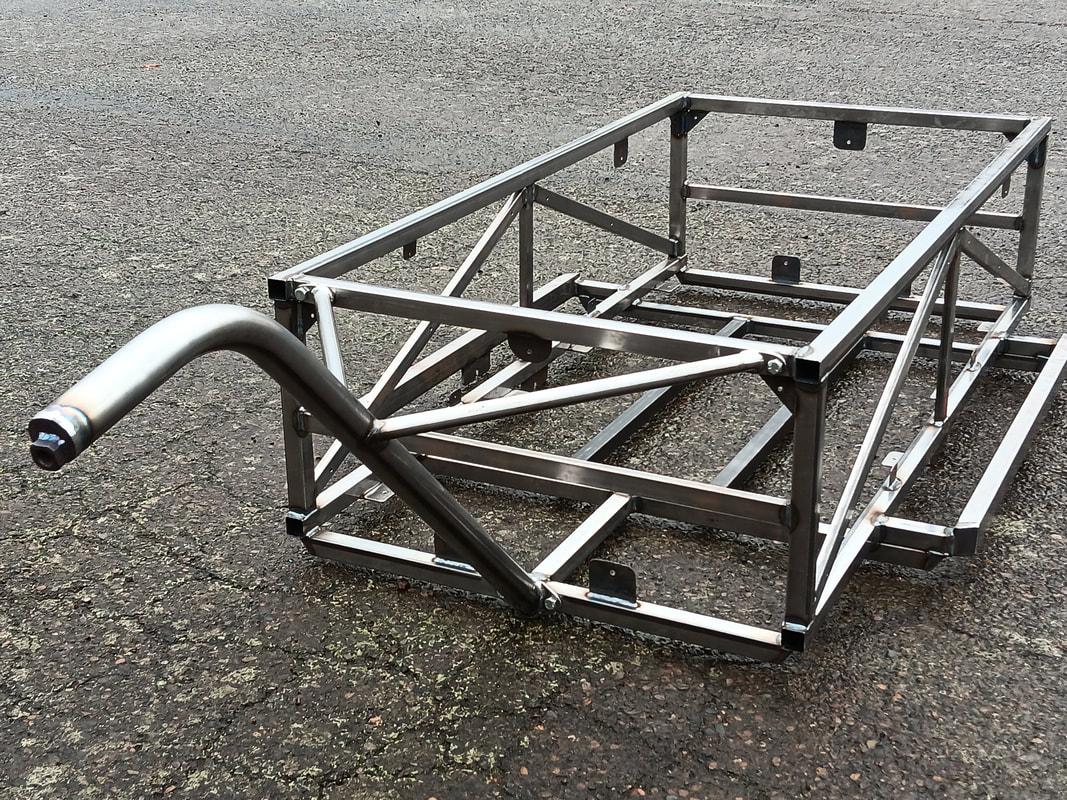 The chassis of the trailer. 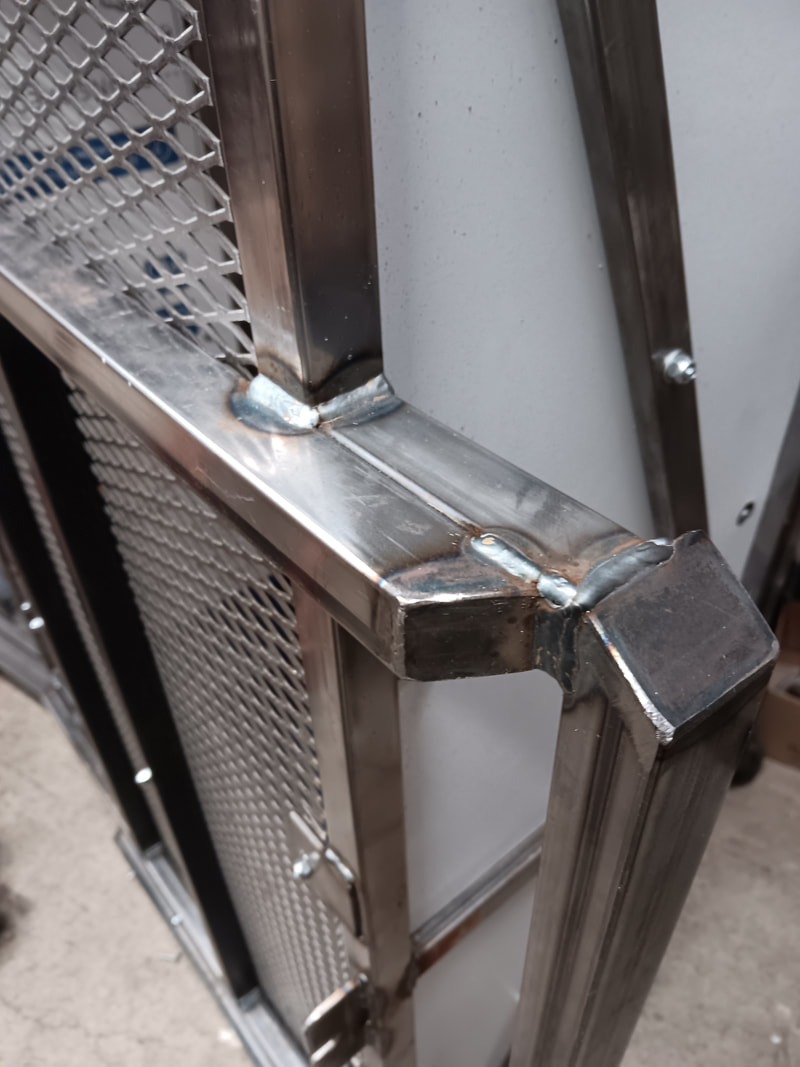  Custom fork time.
 I made this toy sword for my partner's son for Christmas. One of the items on his wish list was "a sword like Sting". The blade is made from two pieces of sheet stainless bent lengthwise to give the blade a hollow, diamond-shaped cross-section.    Kind of blurry, but you can see the two halves here before I welded them together around the edge.  Welded to a hilt.  Gluing some scrap pieces of walnut to the tang.  Shaping the handle with a surform, files and sandpaper.  So I actually made two swords, because the first one was too wide to make a decent scabbard for. I laid the blade on the wood and traced it.  I free-handed with router to hollow out the pocket. It was pretty tedious, and I would think about doing it differently in the future.   Shaping the outside of the scabbard with a plane.   laying out a design for the upper ferrule in some scrap copper I had lying around.   Test fitting the ferrule before gluing.    Well, a lot has changed in my life since I was last active on this website. Generally for the better. I quit drinking. I largely withdrew from my social life. I am in a really good relationship. I've been neglecting my friends and family. Money continues to be tight, but I'm working on being more organized and disciplined. The question of "what the heck am I doing with my life?" continues to exist, but I don't feel the same sense of dread when considering it.  My new work plan has four elements, the four things that feel worthwhile to put energy toward: - Service to family - Service to community - Create art - Support myself in a modest lifestyle Ideally, the jobs that I am seeking will satisfy at least two of these elements. I have gotten myself into a lot of trouble accepting jobs that were miserable and didn't sufficiently remunerate me. Jobs involving lying on one's back underneath a vehicle with an angle grinder come to mind. Thankfully, I'm getting better at knowing where my specialties lie. Certainly bike-related work. I've worked in various facets of the bike industry for most of my adult life, so I have a general understanding of the market. Not so with industrial B2B work. I jumped straight into metal fab without having "come up through the ranks" of working in industrial trades. As such, the bidding and financials of industrial jobs are a mystery to me, and I feel a sense of imposter syndrome at the prospect. Artsy-fartsy stuff is definitely an area I want to prioritize. The economic situation of art sales is opaque to me at this point, but I need to develop a portfolio first anyway. Mechanical design. I'm not an engineer, but many years of building things with moving parts has given me a pretty solid practical knowledge of how to design and build things. I know how to design for easier manufacturing and transport, and I have a sense for aesthetic appeal of the finished product as well. Part of this New Plan of operation is to put down some policies on paper. I'm about the least formal person I know, but I am grudgingly learning to accept that having things systematized and formalized is a much more efficient way to do things. Problems in the past: - Underbidding/undercharging - Being scattered, depressed, anxious or otherwise indisposed - Overrunning on time - Not taking deposits - Lack of professionalism/organization I'm going to start charging a lot more. I run the risk of sticker-shocking my loyal erstwhile customers by doing this, but I would rather be known as better than cheaper. This is directly contradictory to my nature as a people-pleaser, but I can't sustain the hemorrage of time and money that results in. I also need to be much less wishy-washy with due dates. I've always felt behind on projects, so committing to a schedule stresses me out, but with discipline and organization, this can be turned around. Currently I have two large projects due at the end of March. First, I am doing extensive maintenance and repair service on the school district's elementary school Bike Education fleet. It consists of about 40 bikes in varying states of disrepair. I was the instructor for the program last year and I know how finicky some of them could be. I asked the school district to let me overhaul the fleet and they agreed. 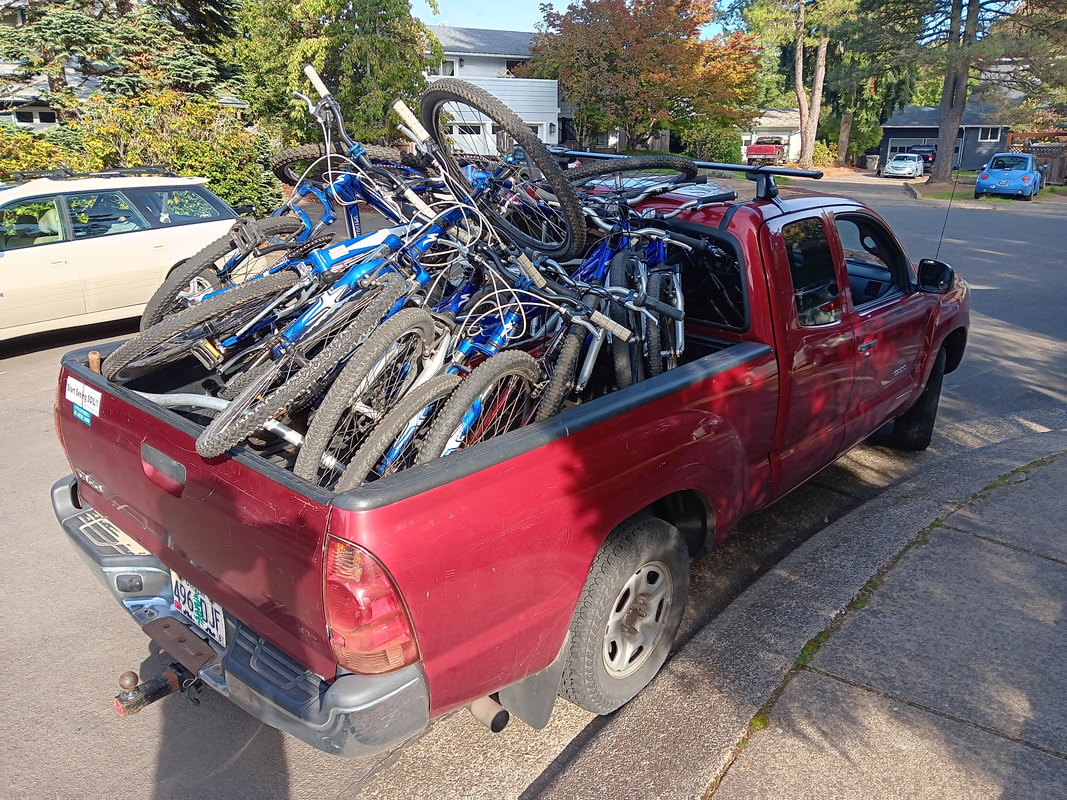 I've been working on them ten at a time. I have a system: - Assess bikes, record serial number and notes - Order replacement parts - Strip off worn consumables like pads, cables, tires, grips - Disassemble components to be overhauled, clean thoroughly and relube - Wash bikes thoroughly and carefully - Reassemble, size and install new cables and housing - Test ride - Final tuning 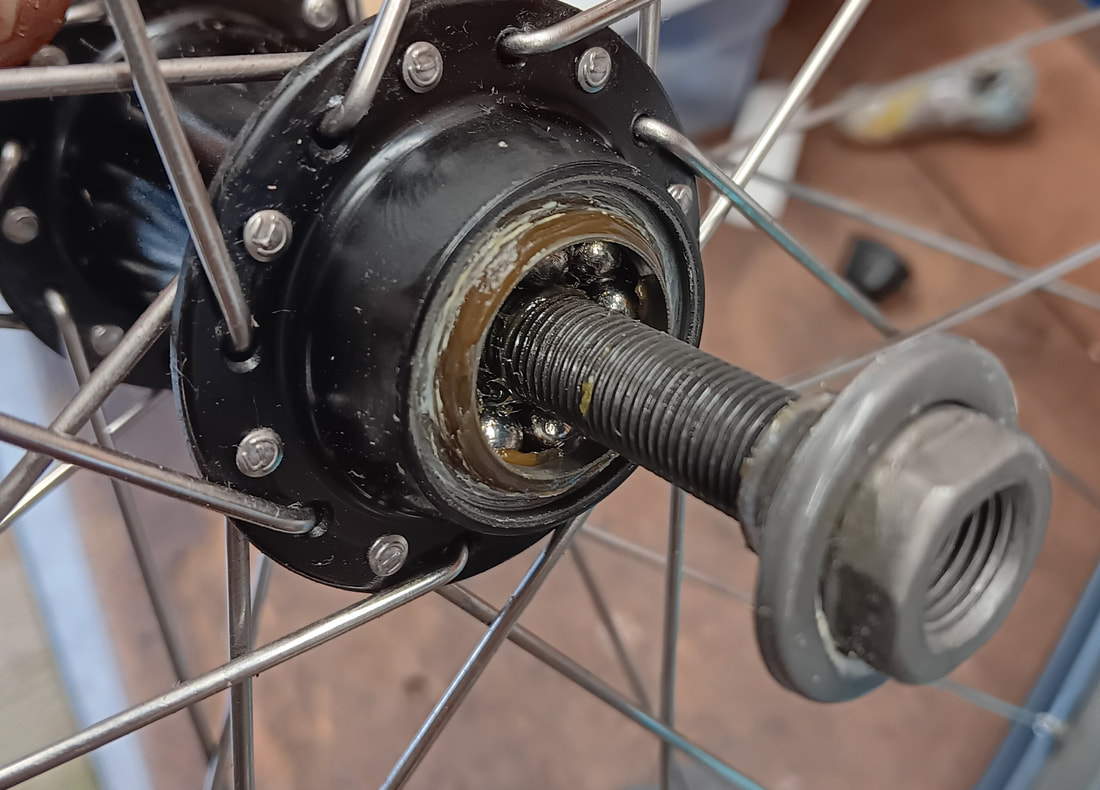 The bikes are old enough that the original grease is degraded, though surprisingly most were not terribly contaminated. These cheap bikes have minimal bearing sealing. I repacked these all with heavy waterproof grease. 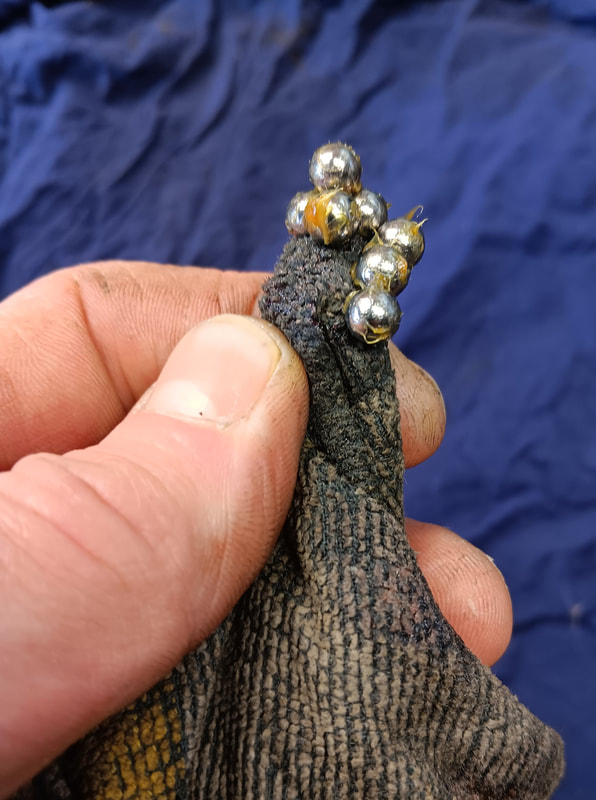 Magnet wrapped in a rag for pulling bearing balls out of a hub.  When I'm an engineer, I'm going to come up with a new brake pad standard that has even more loose parts than a V-brake. 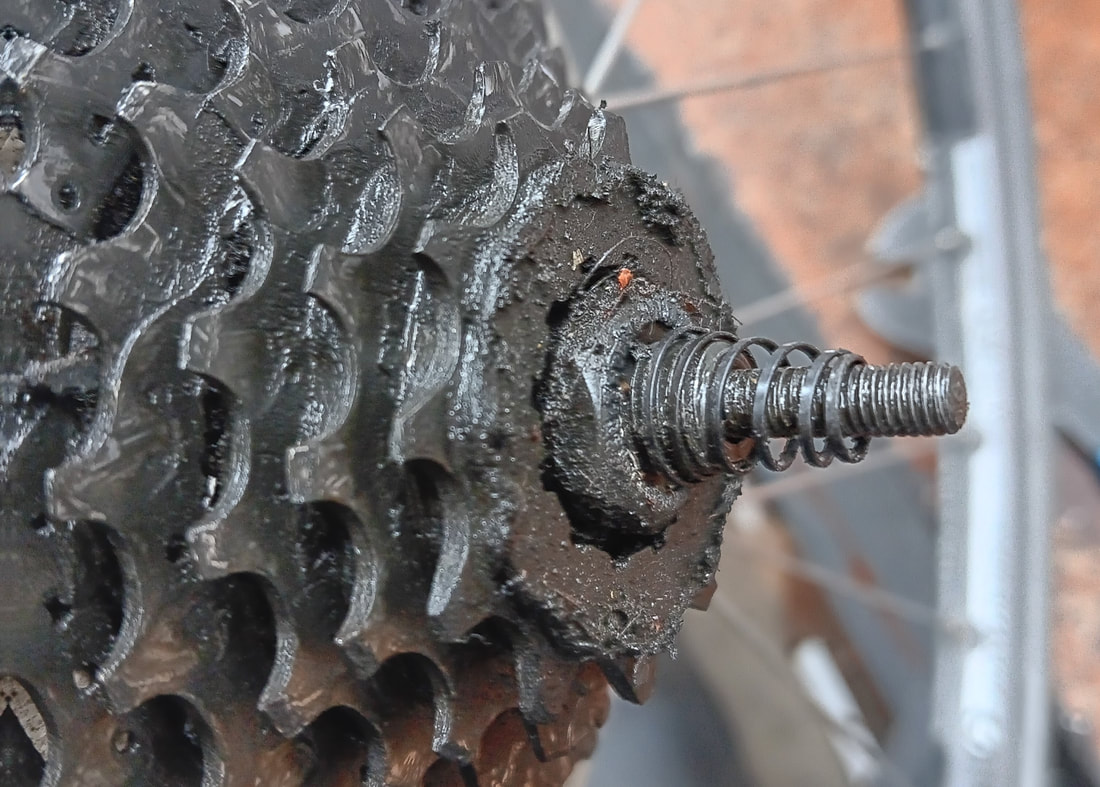 This is one of my crusades: to teach people which way the quick release springs go. This picture shows the wrong way! The pointy side goes in. Also of note, a very greasy, dirty cassette. Using a dry lube and wiping off the excess when applying will really cut down on this. A clean bike is a funner bike to work on and to ride. As a bike mechanic, I would say that about half my time is spent cleaning bikes; this fleet is no exception. 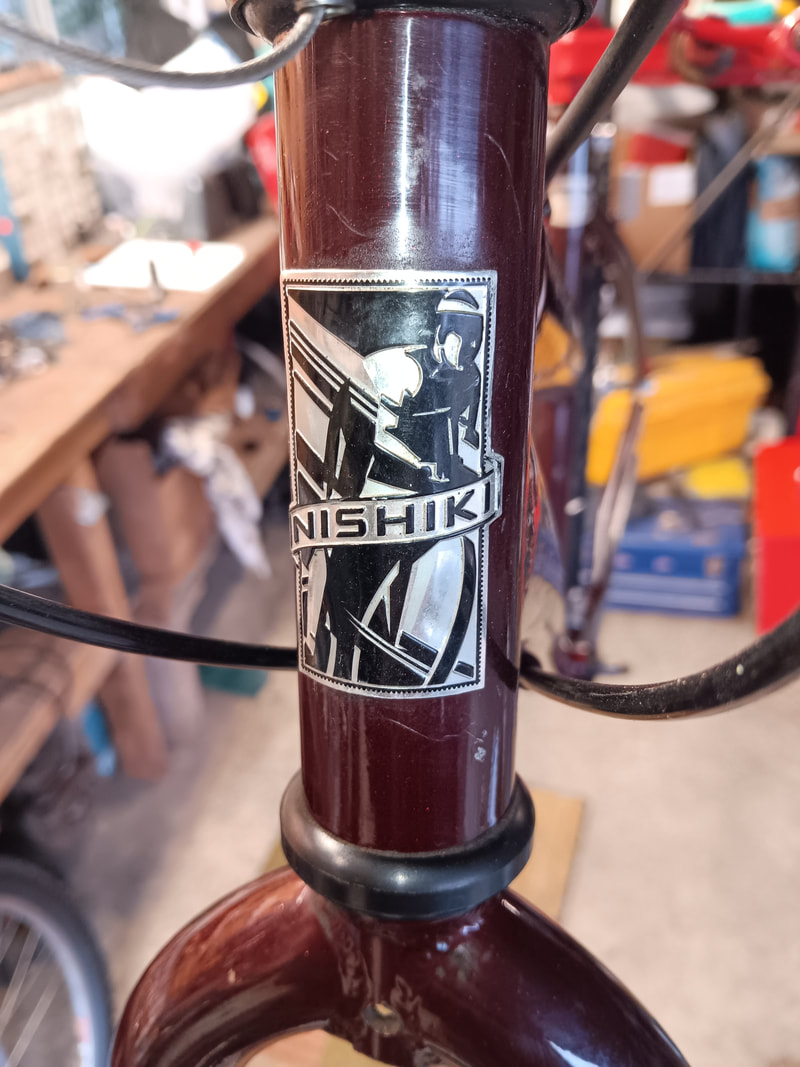 I like this head badge. I've also been working at Corvallis Cyclery. It's a really great shop. An enormous brain trust of bike knowledge, but more importantly, a crew that really cares about doing a good job. We are all bike enthusiasts and we want to share the experience of a well-maintained bike with everyone.  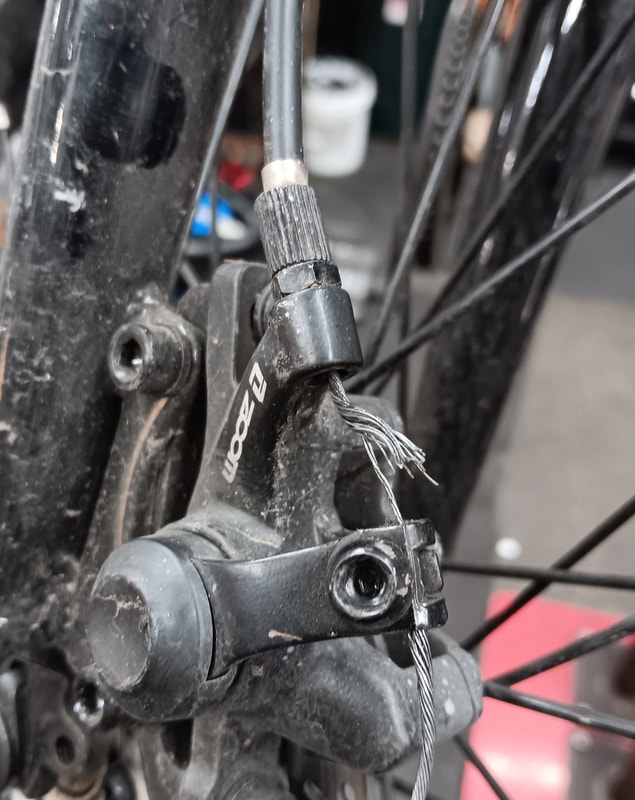 The above photo is a bike I worked on at the Cyclery. The rear brake was completely nonfunctional, and this front brake has a cable that is frayed to its last two strands. This was on an electric folding bike. Glad we got it taken care of. 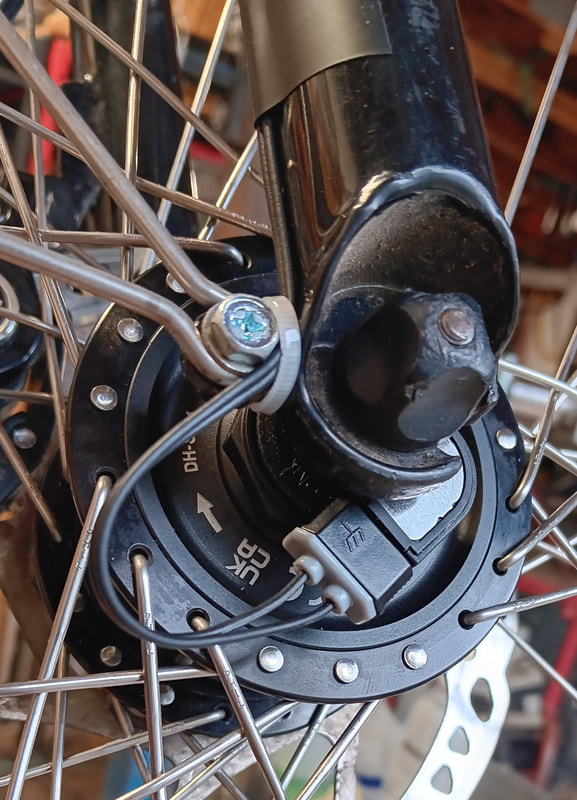 Some clean generator wiring on a three-leading, three-trailing laced wheel. 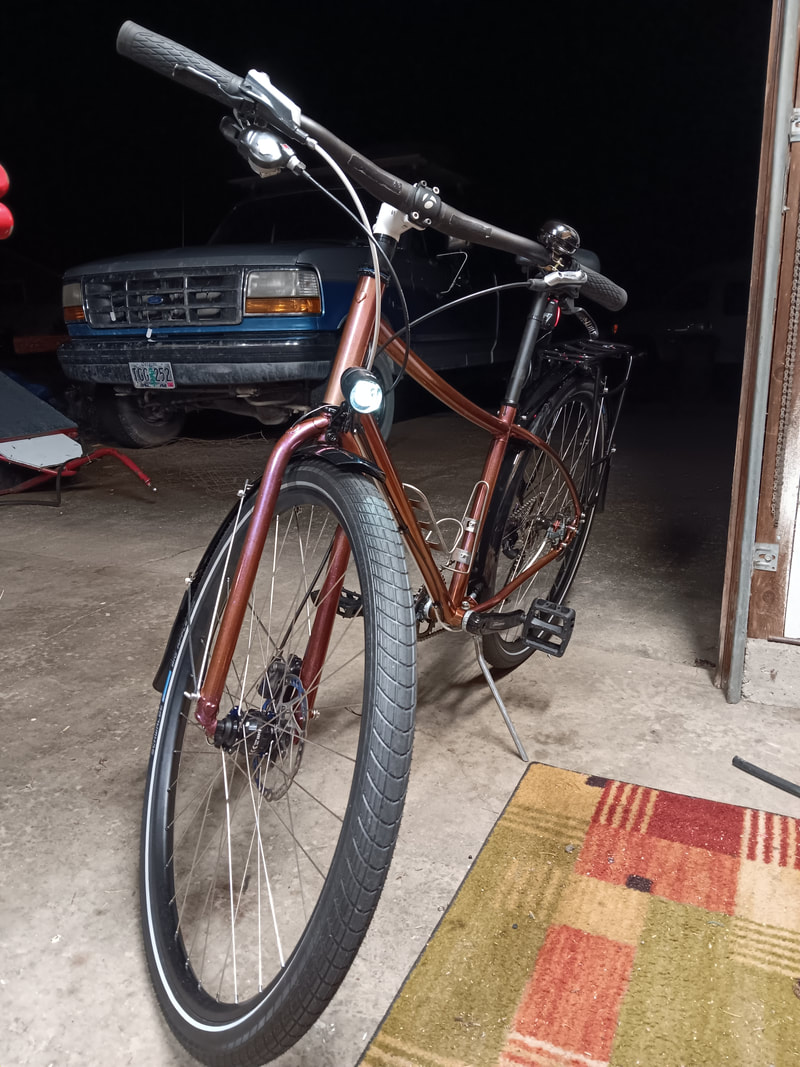 A bike I built for my partner. 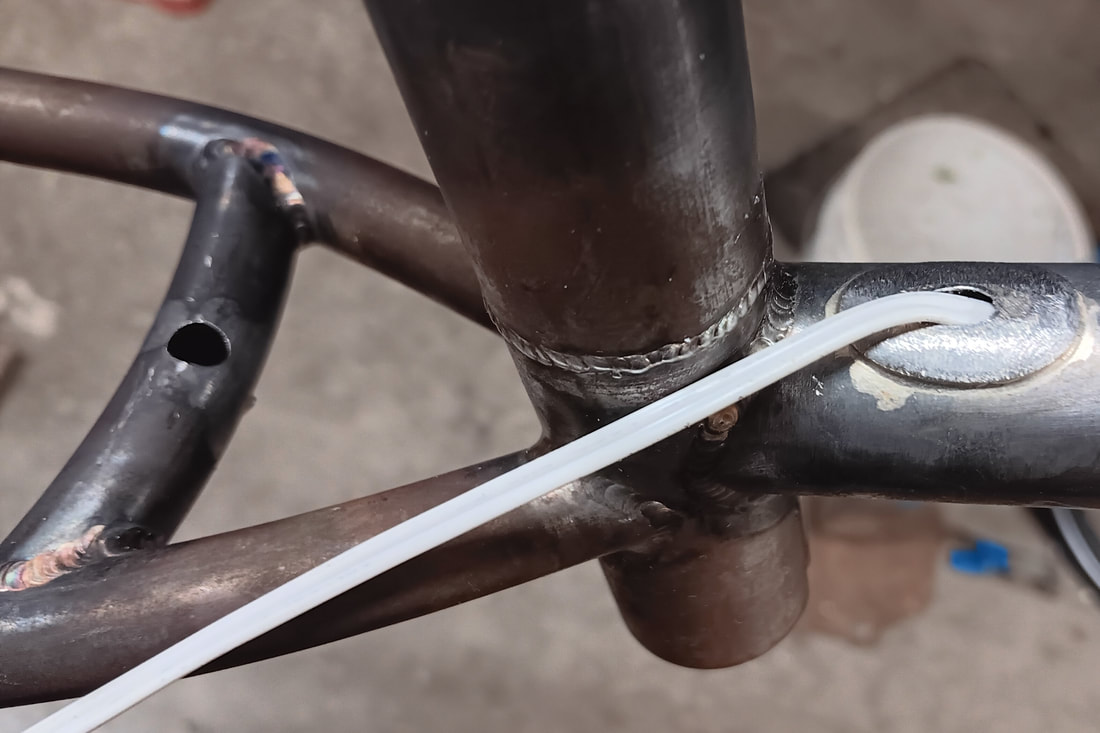 Internal generator light wiring to protect conductors.    A pencil drawing inside the front cover of a bike part catalog from 1931. 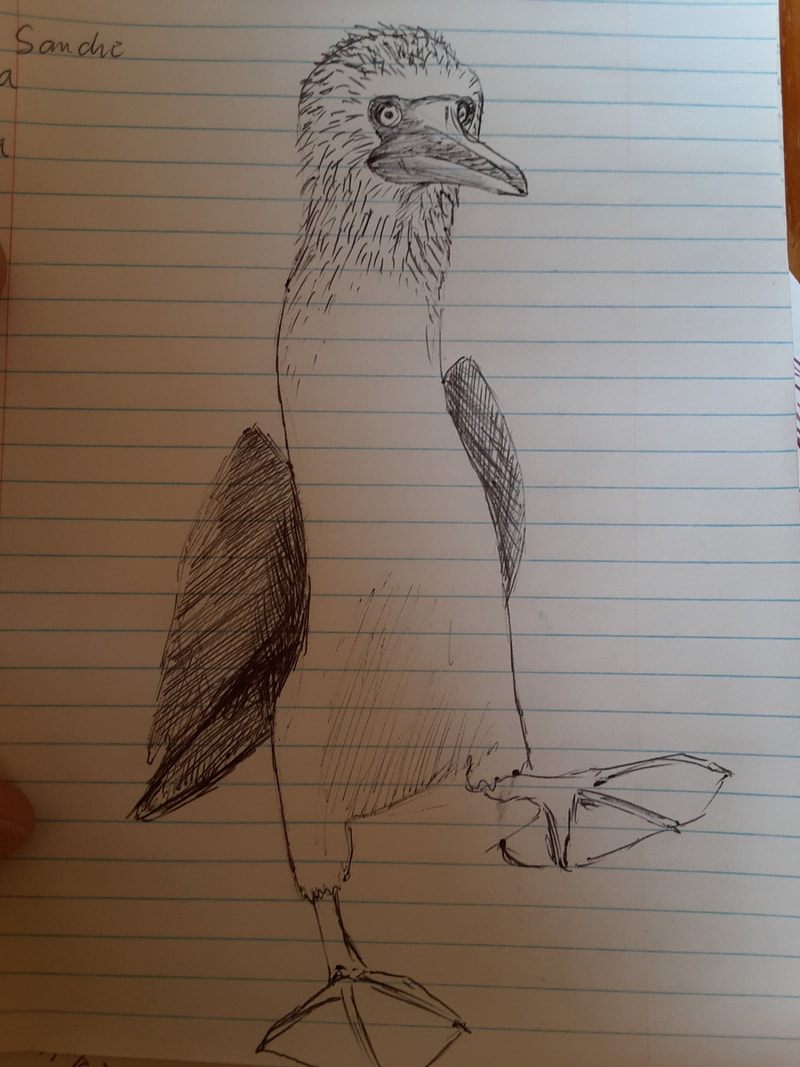 Blue-footed booooooby  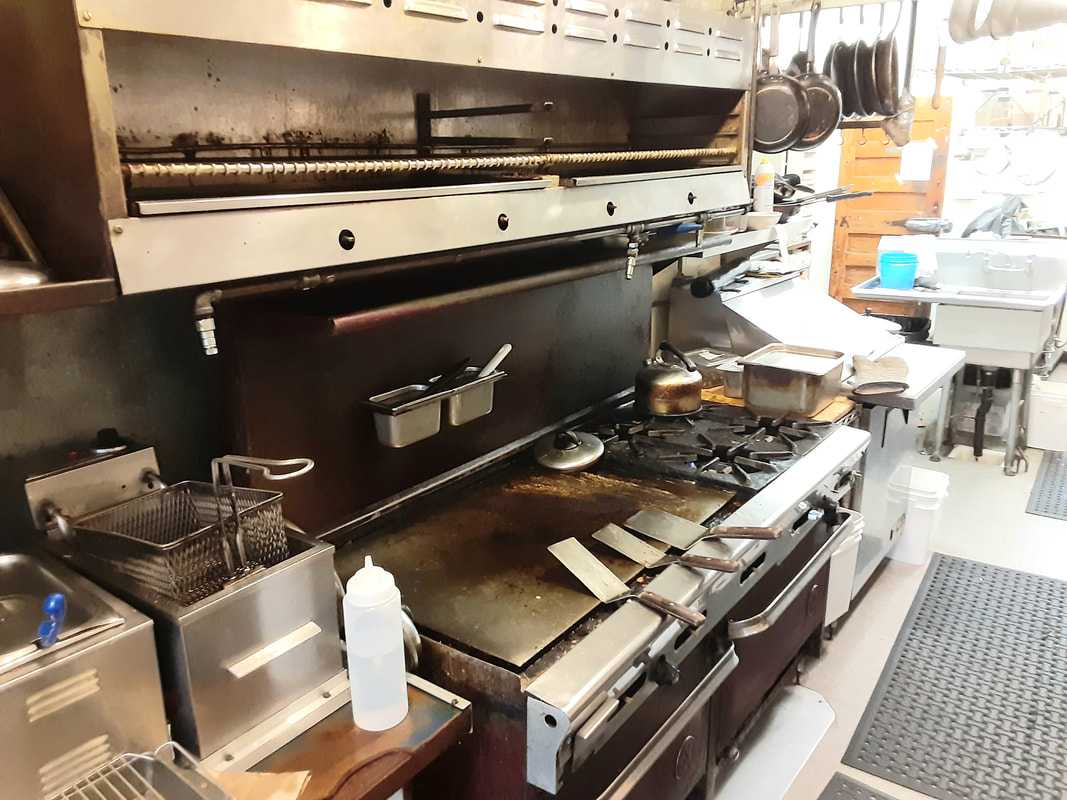 Normals' cookline after the lunch rush.  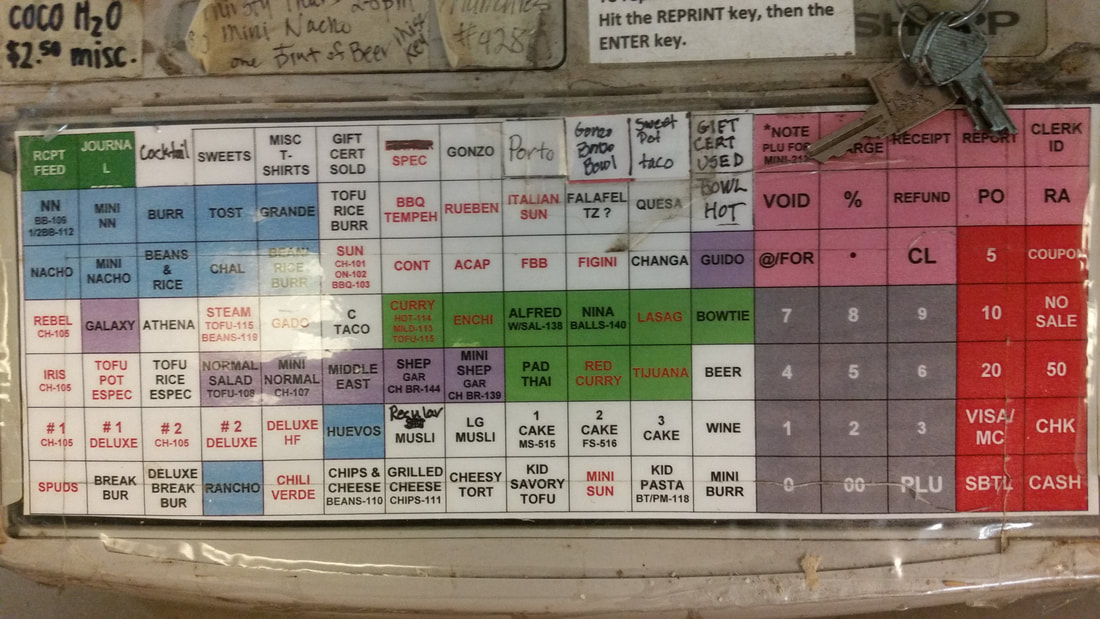 The Normals register was hilariously complicated. The red text items were to be called out to the cook. The green were dinner only. Blue was breakfast only. I don't remember what the purple meant. Salad plate?  I've been trying to design a really functional workspace. I got kind of obsessed with screwdriver holders for a while, as evidenced by this one made with figured walnut inlaid with stainless steel wires.
I recently have been hired to teach the 5th Grade Bicycle Education Program for the Corvallis School District, which is a 10-week full-time job in the Spring. I also have been hired as a mechanic at Corvallis Cyclery, though I haven't started yet. I just really need to make some income. I haven't been able to support myself in even a frugal lifestyle by running this metal fabrication business, so I need a real job or two, at least for a while to get my feet under me again. I enjoy making things, and I'm definitely getting better at making money at it, but it's not getting better fast enough to prevent me from being broke. That said, feel free to approach me with project ideas. I have been making a lot of railings lately, as those tend to be reasonably lucrative for me. And I love the fun, artsy stuff, it just has to be supported by a reasonable budget on your part, because that kind of thing usually takes a lot more time, backtracking and experimentation to get to the finish line. The fun creative stuff is one area in which I have really lost a lot of money. That's ok if it's a "labor of love" so to speak, but it doesn't make for a sustainable business plan. Anyway, here are some pictures of what I've been working on since my last update. I got asked to make a big world map for a driveway gate out in Blodgett. It's about 3m long. The first step was to have it printed full size at a local print shop downtown. Then many hours were spent with a razor blade cutting out the paper.  The paper template was then traced onto 18g sheet steel and cut out with a plasma cutter. Here's part of Eurasia: 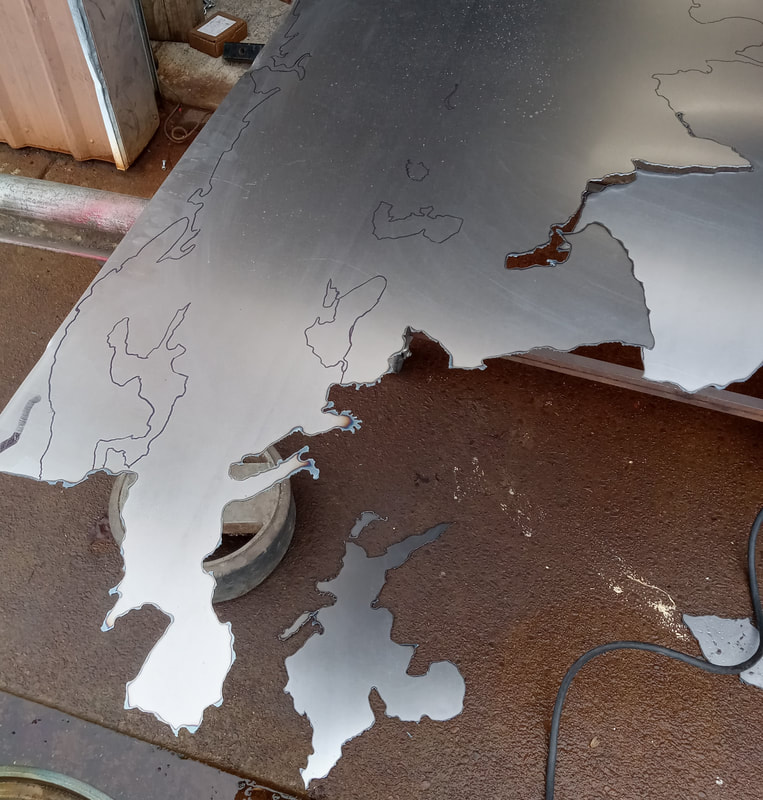 Then the continents and islands got welded to this 4x4" wire mesh fencing. 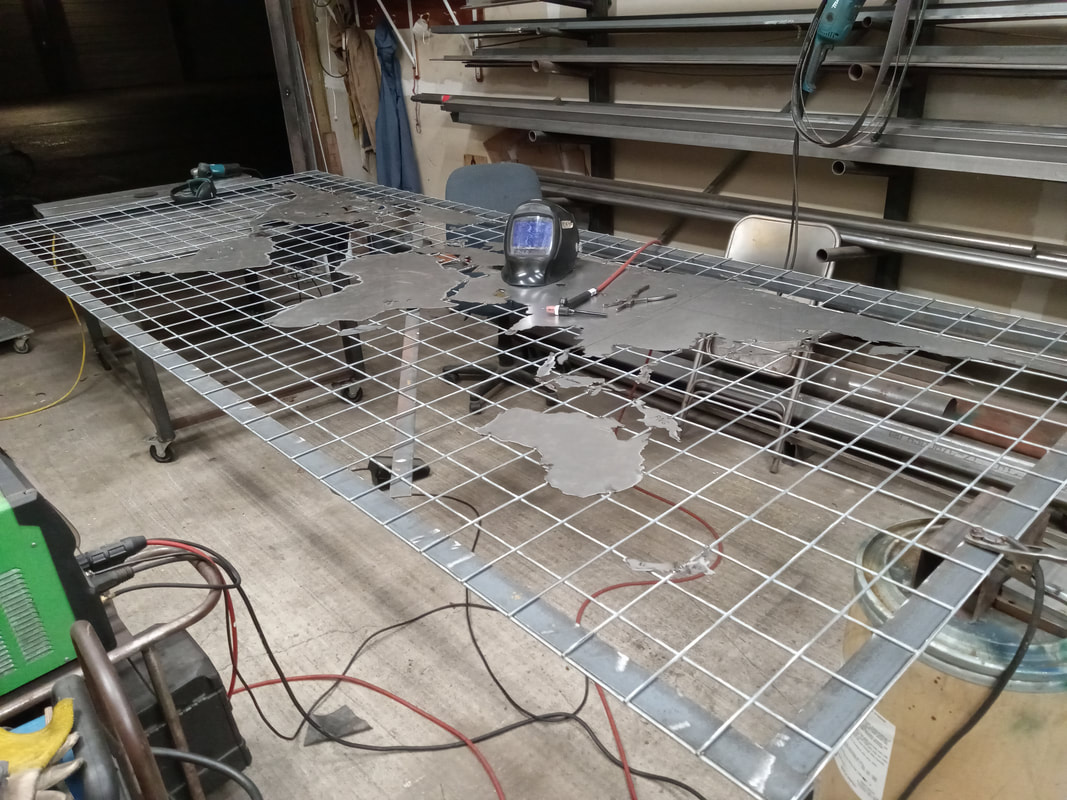 The finished map:  Lots of other random projects. Here's an adjustable-height burner stand for Oregon's oldest beer-brewing kettle at Oregon Trail Brewing: 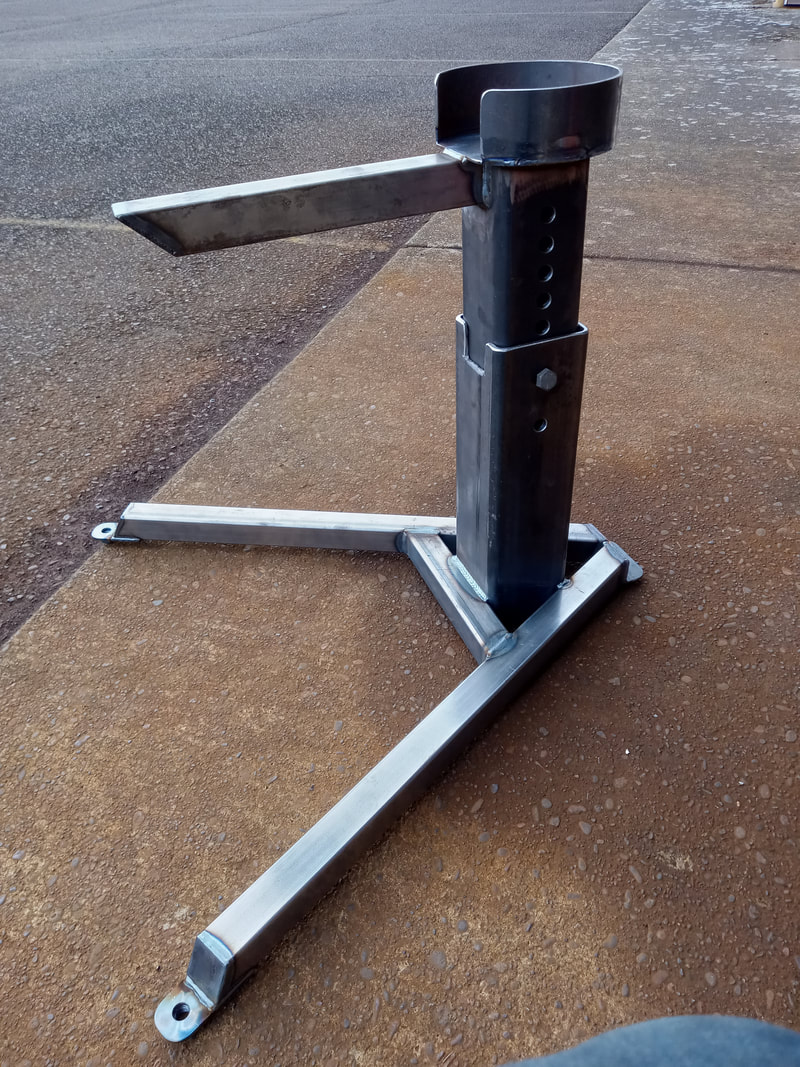 The clamping mechanism for a disassemblable swing set frame: 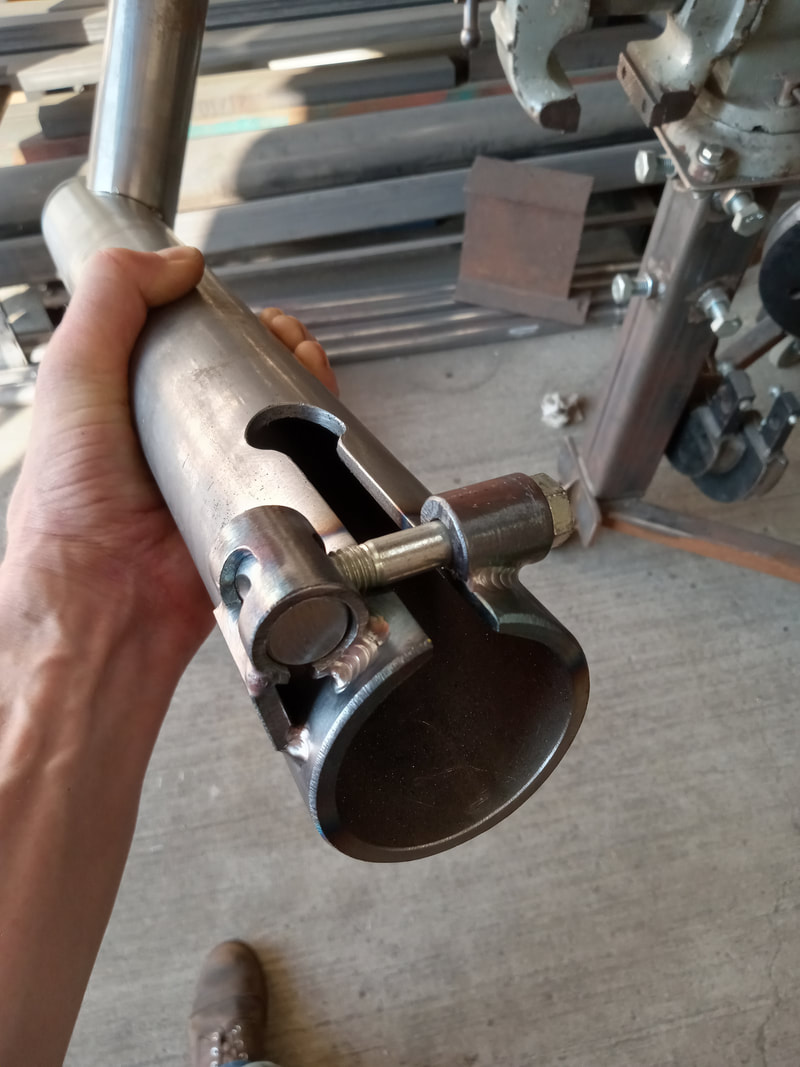 Boutique nutcrackers for Mark of McGuire Mechanism (www.mcguiremechanism.com) 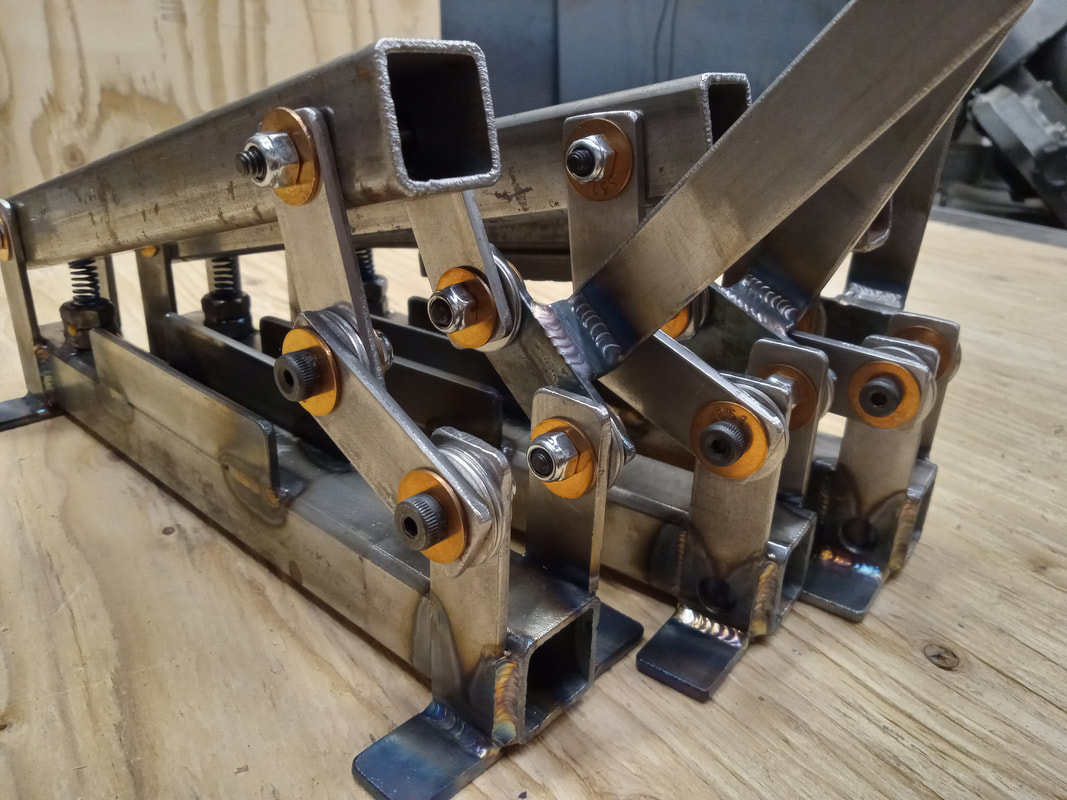 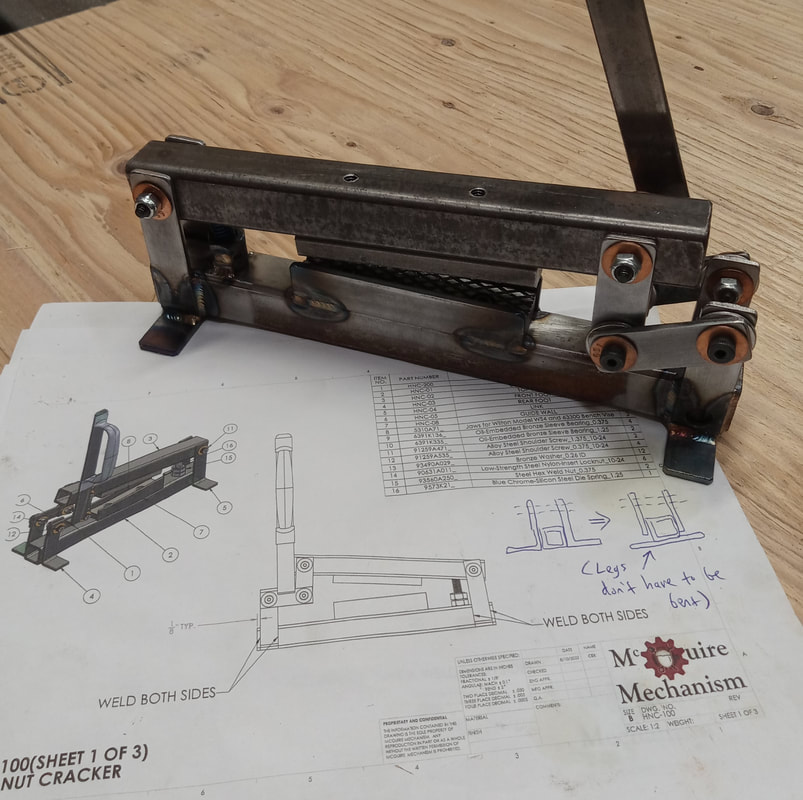 Using a friend's forge to bend some handrail cap into lamb's tongues: 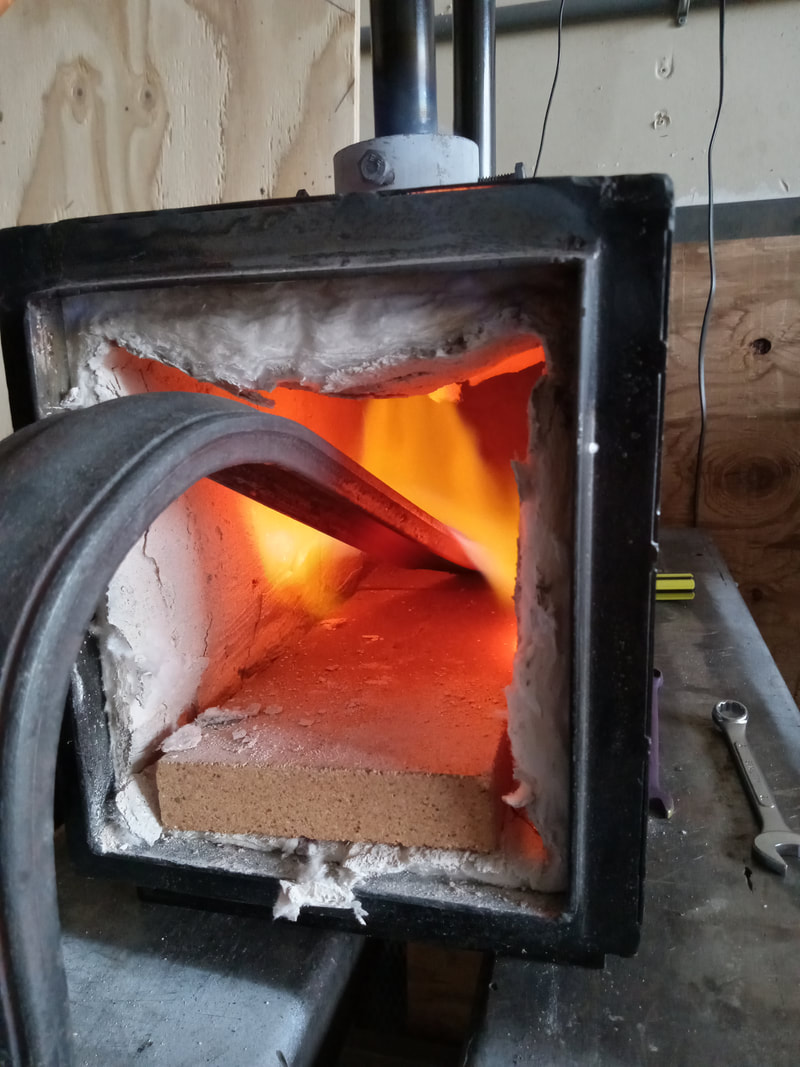 Decorative railing end-pieces, or "lamb's tongues". These get welded on to the ends of railings. This was my first attempt at forge work. 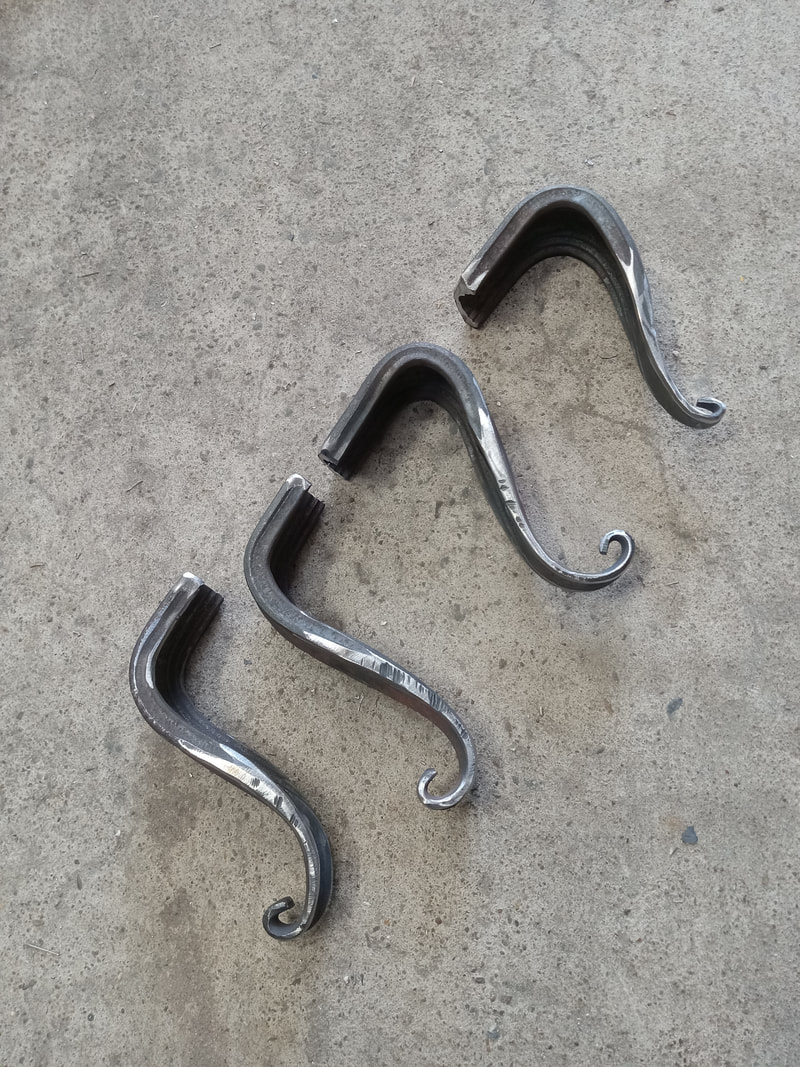 Fancy railing system for a porch and steps: 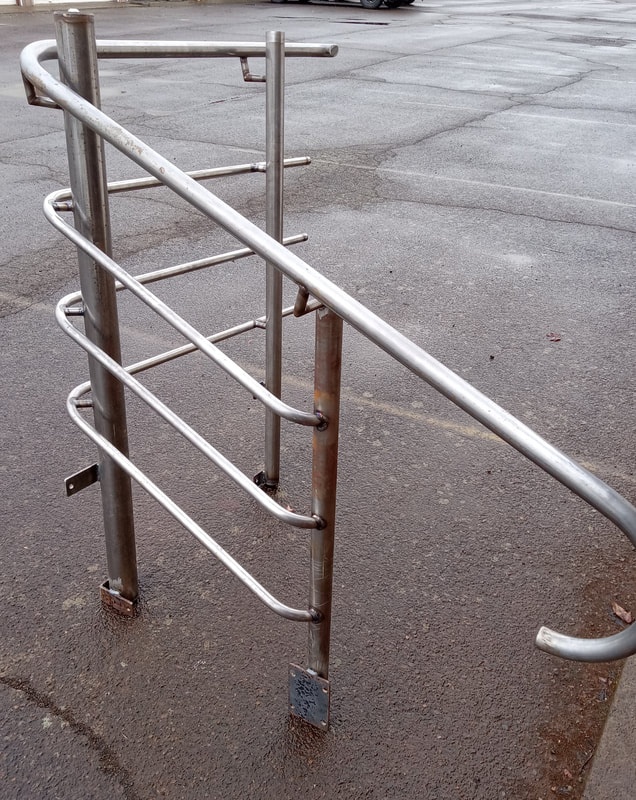 Bike repair stand height adjust counterweight mechanism. The repair clamp bolts to a slider that rides up and down on a 3" post. There is a 50lb counterweight inside the post attached to a cable that runs over the pulley and down to the slider. My bike is very heavy and I am very tall, so it's nice to have help raising it up to an ergonomic working height. It works ok. There's a bit too much friction in the sliding action, but I have a plan to use adhesive-backed slippery plastic strips on the post. 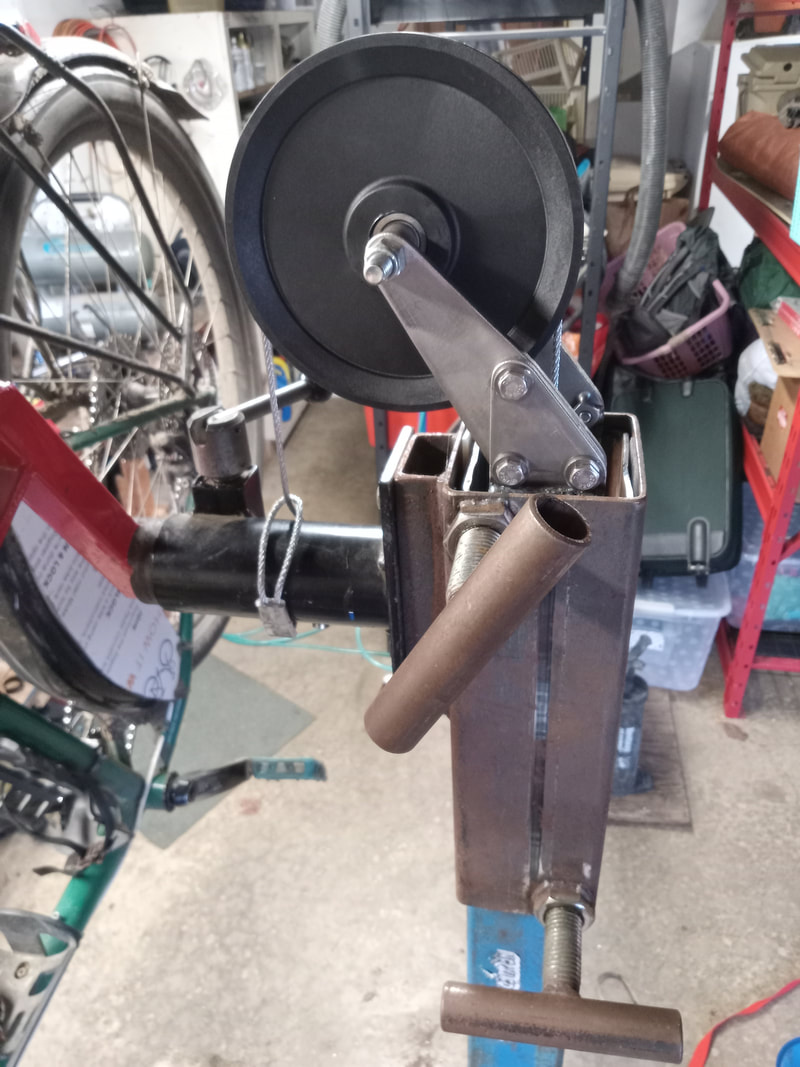 I always like to watch for signs of Spring, come January and February. I've heard some distant frogs, seen the daffodils coming up and daphne getting ready to bloom. There's a good daphne bush on the East side of the Valley Library if you need something good to smell.  Wow, Spring rages on. Delayed this year, but I'm not complaining. The camas are in full early bloom, when the top of the raceme is still in tight buds. The best time for camas! I'm excited for larkspurs and big, burgeoning cow parsnips. Reports of my retirement have been greatly exaggerated. Finished this biohazard storage cabinet for the Health Department: 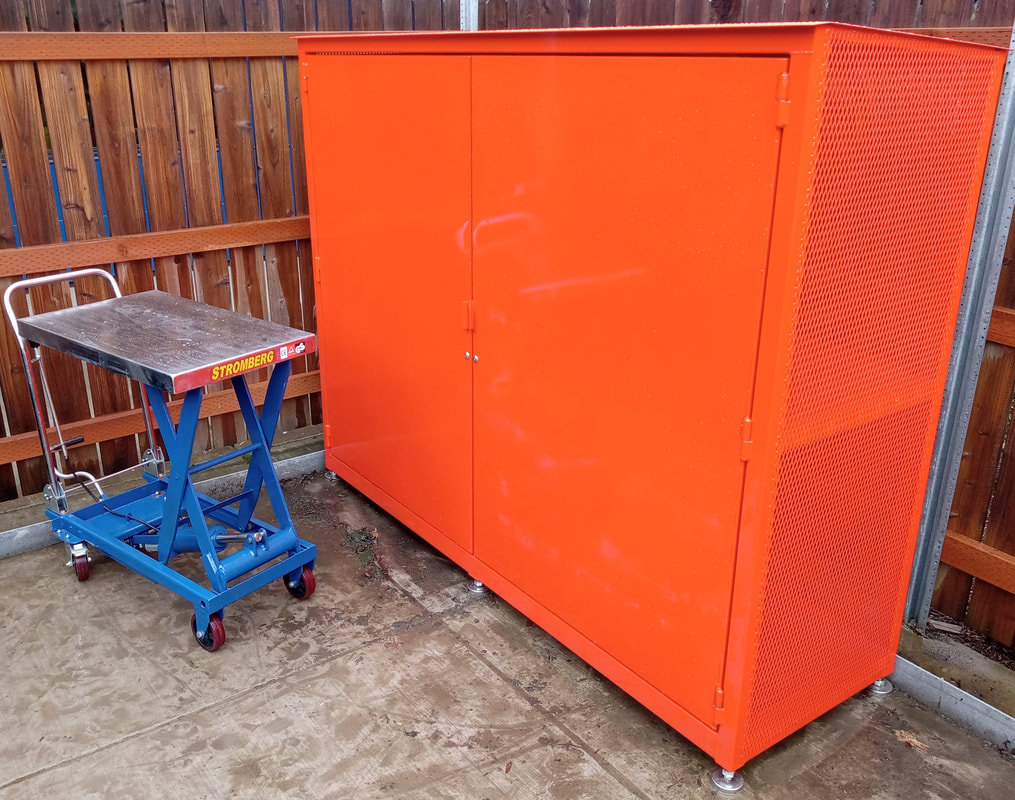 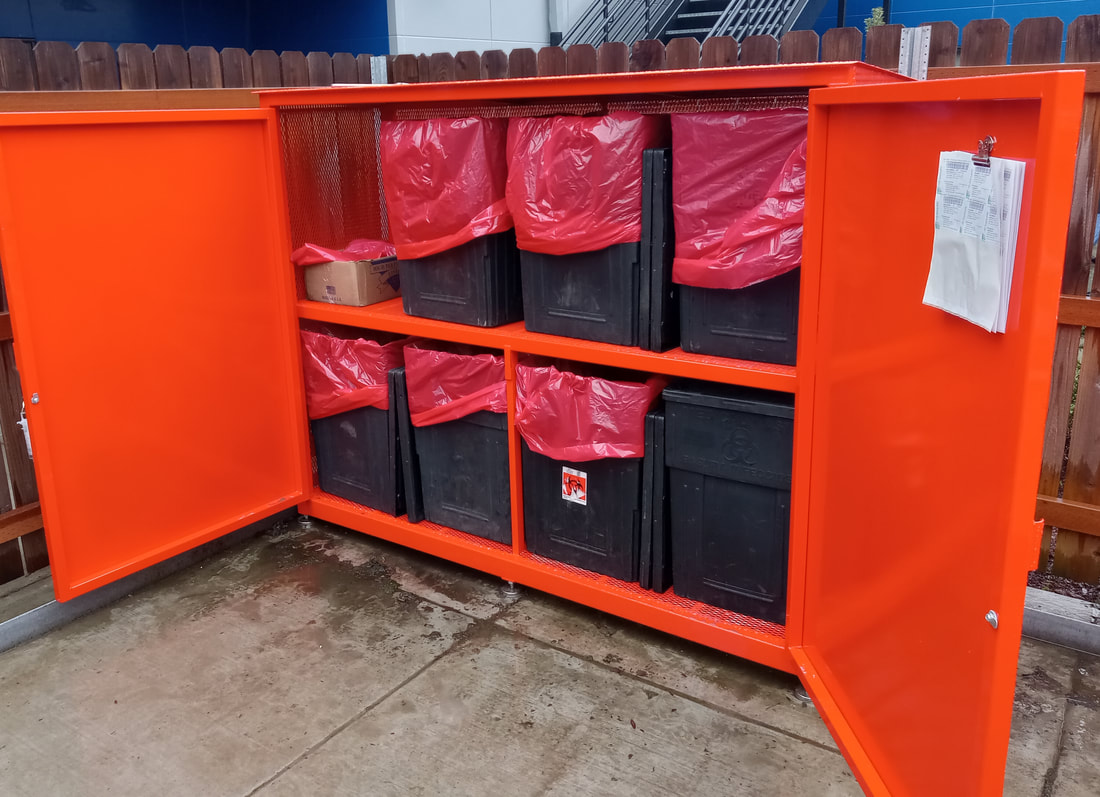 Sheet metal is not really my forte, but this is basically a tube frame with sheathing tacked onto it. I should have cross-braked the door panels to prevent oilcan booming, but it's not too bad. Tiny tacks make for low distortion. Pretty much done with the metal parts of this bench. Just needs powdercoat and wooden armrests. Haven't gotten a picture of the finished frame yet. This is from a test-fit a couple weeks ago: 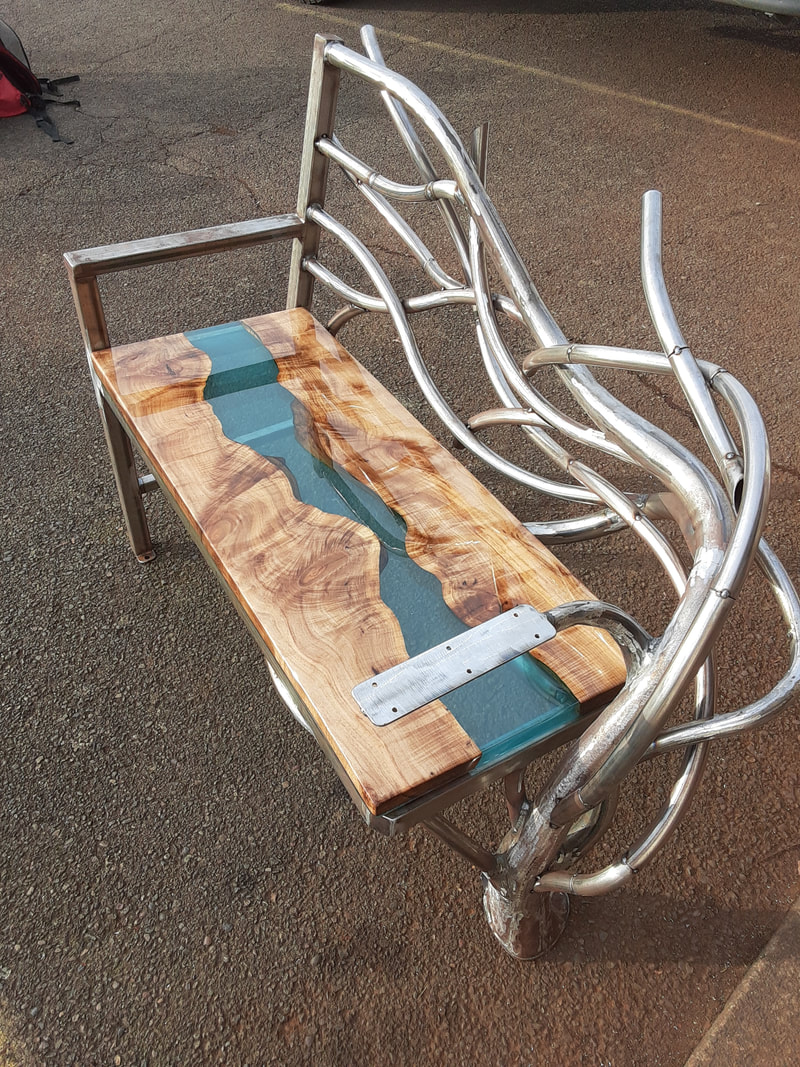 The Farm Home is getting a bicycle repair program!  They got a grant to put together a tool kit and some basic replacement supplies (tubes, pedals, brake pads, cables, etc). We are also putting together a cart so the workstation can be moved outside. Not quite done yet, but here's a progress pic: 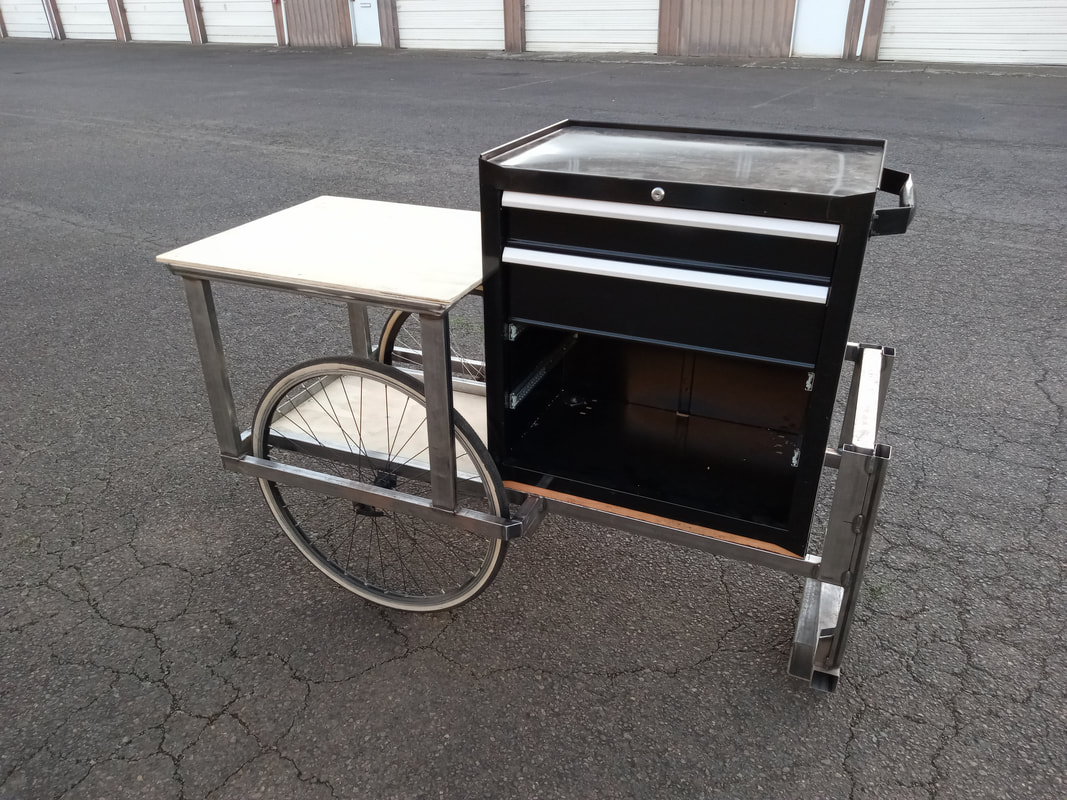 A super-contorted piece of oak:  I'm quietly "going out of business" or at least spreading that rumor. These seven years of trying to make it in the metal fab business have been.... quixotic? Maybe that's the wrong word. I had Covid last month and I spent the time doing some reading about entrepreneurship and business operation. It made me realize that I have basically no aspirations of being an entrepreneur. My takeaway is that entrepreneurship is basically channeling your creativity into building a money-making robot. What a soul-sucking endeavor. There are so many more worthwhile things in this world than creating mindless money machines. What does one truly have to give the world? A half-assed metal fab business is not worth shit in the grand scheme of things. Great, so I welded a bumper for somebody's truck last week, whoop-de-doo. We're still headed to hell in a handbasket. Nothing is really changed. What if it's a friend who asks me to weld them something though? By helping them, I'm serving my community and deepening my relationship with that person. What if it's a stranger who asks me in good faith to help them with something they don't have the skills or tools to do on their own? In doing so, we forge a new connection and strengthen society a tiny, commensurate bit. What if my enemy lays down his sword and graciously asks to collaborate on a project to benefit the world? Who would I be to pass that opportunity to heal a wound in the soul of humanity? So, I'm confused about what I should do. On the one hand, I've learned a lot about how to make things, how to advise customers on best practices, how to design things for optimal human interaction. On the other hand, what the heck am I doing with my life? The big question posited by the boring business book that I read during Covid quarantine was, "What do your customers want that they can't get elsewhere?" The answer, in terms of metal fabrication is, "I have no friggin' idea." I have no real background in metal fab, industry, welding or design. There's a lot of tradition, institution and knowledge that exists in this realm that I have never touched by transitioning from being a hobby welder to trying to run a professional shop. I have no particular credentials nor credibility in the real world of industry. What it comes down to is a desire for belonging. To be worthwhile to the world for more than just existing and being a "nice" person. There might be a place for some metal fabrication in this clarified goal. After all, I still need to make a modest income, and if I can truly help someone in a reasonably lucrative way, then yeah, I'll weld some stuff. Until I figure out something better, it's at least a way to keep the lights on. But I feel like there's a lot more out there than settling for running a half-assed metal shop. There's some need in the world that I haven't figured out yet that will both provide for the common good and provide me the means for a modest lifestyle. "Strength doesn't grant us the right to rule, it gives us the ability to serve." That's a paraphrasing of a quote from my favorite book series, "The Stormlight Archive". It comes from a conversation on being a good human, basically. In the books there is a group of people called the Knights Radiant who swear oaths to: persevere in life, to be strong and just, and to live well. When they swear these oaths, they form a symbiotic bond with spiritual beings called "spren" that grant the Knights special powers. It's a story about redemption. At least that's what it means to me. Flawed and failed humans being given next chances to be something better. Maybe it's silly for me to draw such inspiration from a work of fiction, but hey, some people read the Bible; I read Stormlight. (The author is actually Mormon, and probably would feel weird having his books compared to the Bible). When I am tempted to give in to apathy and depression, these dang books make me realize it's worthwhile to keep working toward something better. Looking back, I need to acknowledge my awesome customers. I've had the privilege of working with a lot of really cool people on a lot of cool projects. My service to these customers has been... erratic, oftentimes. I know there have been a lot of times when I've been a crazy weirdo who doesn't return phone calls, blows past deadlines, speaks rudely, and leaves work undone. Thankfully, despite these setbacks, there have been a lot of successes too: The organ bike, the carnival rides, bike frames for tall people... For what it's worth, I don't feel bitter or regretful at all. Rather, I feel quite a sense of opportunity and optimism about the future! There is work to be done. Art to make. People to love. A world to try to serve. The main project I've been working on lately has been an artsy-fartsy bench for my friend Rebecca who I met in September 2021. On its face, a park bench seems like a pretty basic project: a few legs, a seat and a back; boom, done. But what she was really asking was for me to help her make an art piece to share with her neighbors. She's got the one prime sunset-viewing spot in the entire neighborhood, and this bench is going to plop down so that the neighbors can share in the enjoyment. Now that's pretty darn cool, and it deserves a cool bench. Keeping with the neighborly theme, my 'cross-the-street neighbor, China gave me a bunch of sycamore from her backyard several years ago that a friend then milled into 2" slabs. The slabs slowly were given away or repurposed until only this one was left: 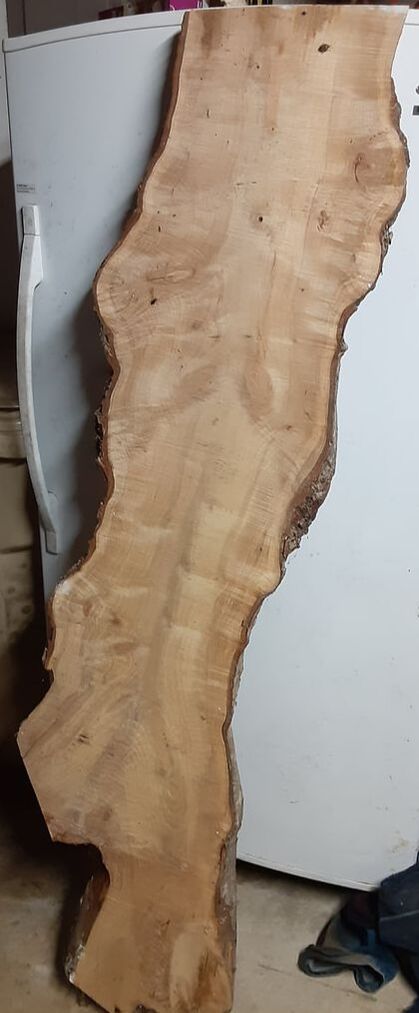 Then, after some sketches sent back and forth, we arrived at a rough concept plan: 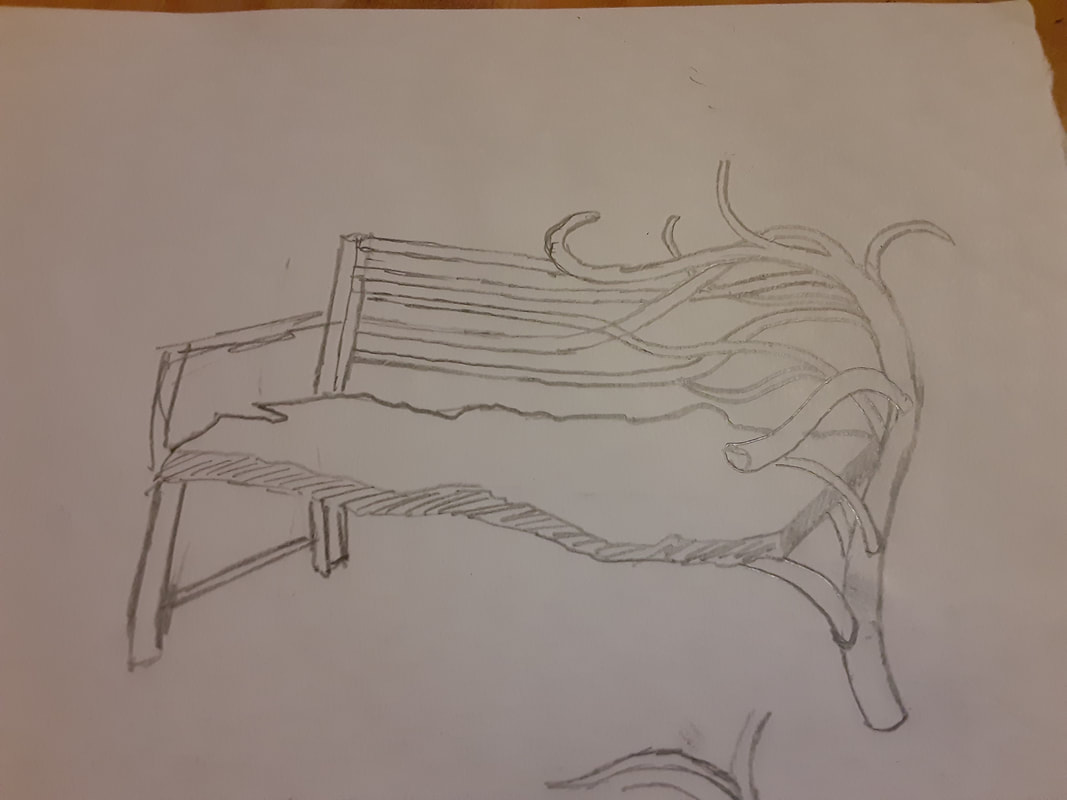 Here's what the frame of the bench looks like so far, six months later: 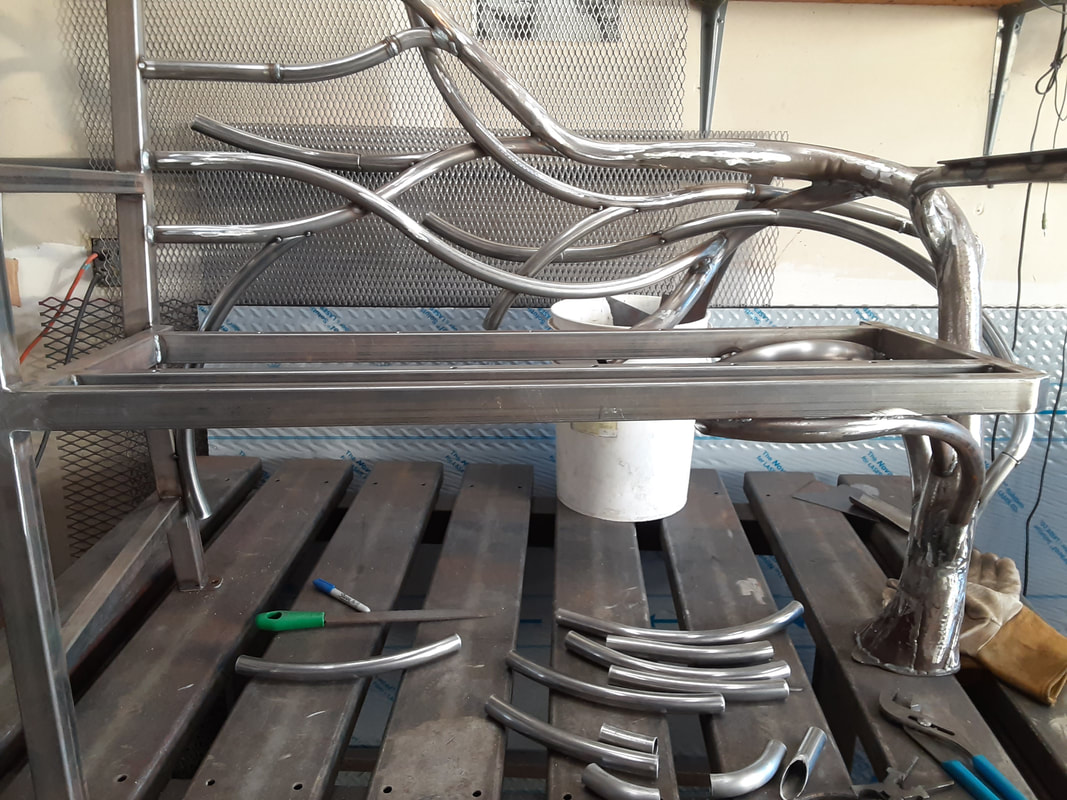 It's not quite done yet. There are a couple of branches left to go. The upper right corner needs a bit more fill-in for the design to be aesthetically balanced. And after some discussion, we decided to go the whole nine yards and do the "river slab" thing with the piece of wood for the seat: 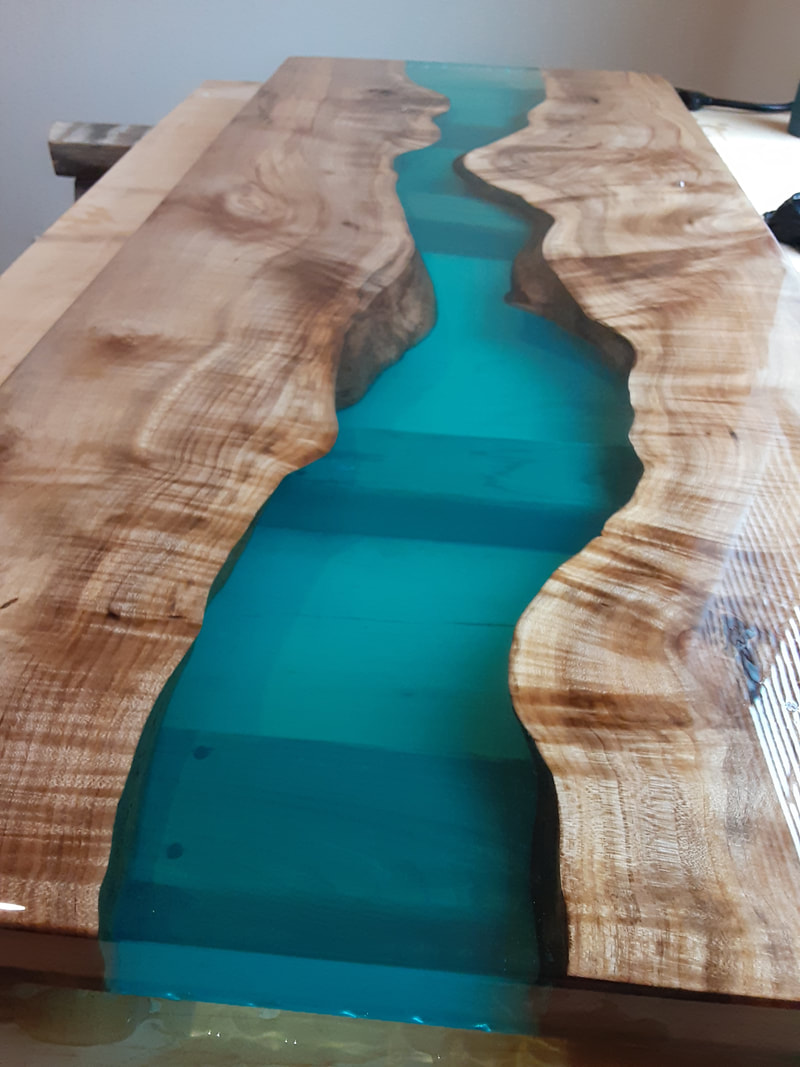 The two haven't been put together yet, but we epoxied threaded inserts into the underside of the slab for bolting down to the frame.
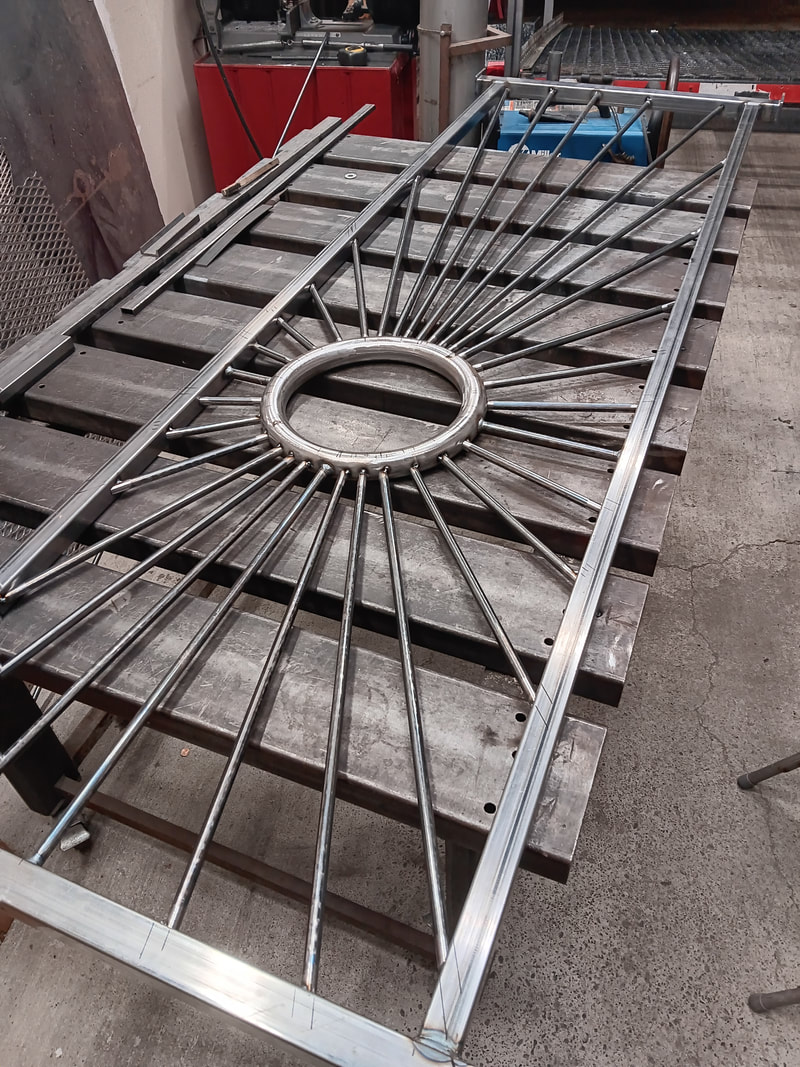
It's been a really fun project. More than fun, because of the intent behind it. It feels worthwhile, where it would be maybe frivolous if not for the fact that it's a gift to the community. I don't know what "art" means (I've heard a lot of opinions), but that feels like art, because it makes me feel a connection. I'll post photos when it's done. Not too far to go now. Been cranking away on this big railing job. One nice thing about railings is that it feels like something that is actually beneficial to the world. A lot of people are going to touch them, and be supported by them.  This is a railing for a commercial space that is being remodeled into an apartment on 2nd Street. Nothing fancy or ornamental, just utility and code compliance. That said, there are details to consider, especially when something's going to have direct human contact.  I'll never mig weld another handrail if I can help it. Tig welding is the way to go. It looks a lot nicer, and doesn't create spatter, which creates a rough texture near the weld. Mitered round tubes are hard to mig weld without getting a lumpy bead in places where the gun angle gets too shallow, as it's difficult to follow the contour around. Spatter and lumpy welds can of course be mitigated after the fact, but I'd rather spend my time welding than grinding. 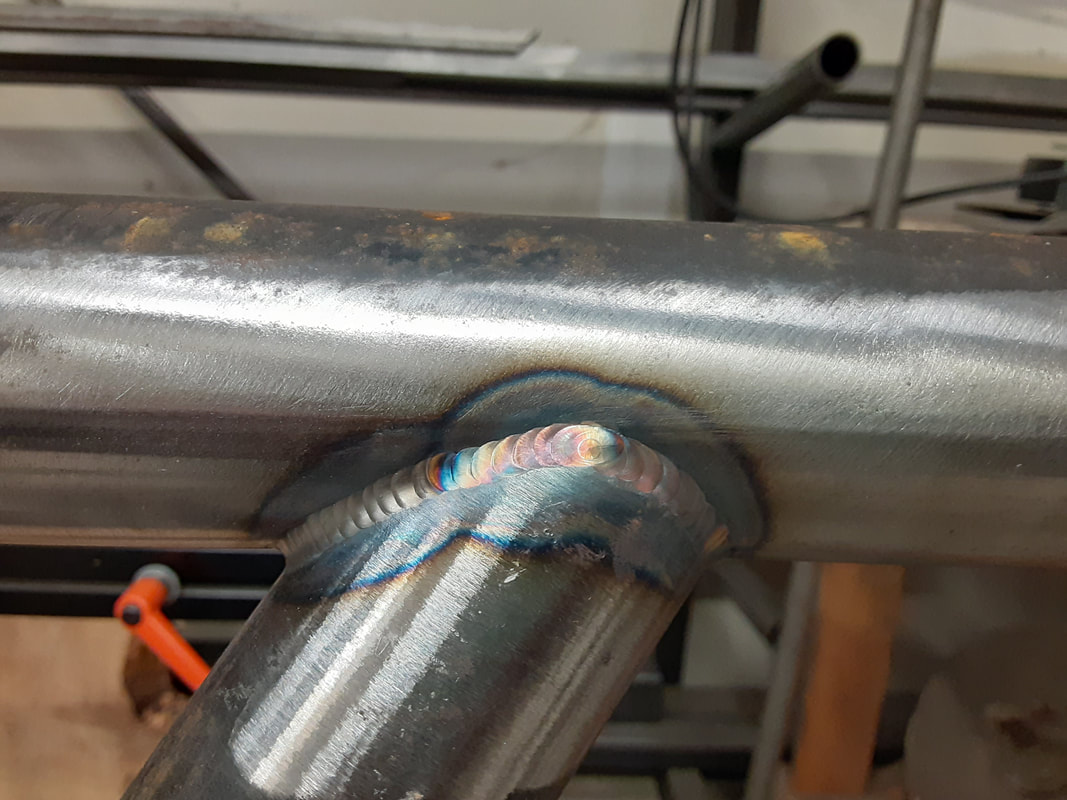 I've been using a stainless TIG welding filler rod lately, because the humidity in the air makes my non-stainless rod rust, and I don't want to be putting oxides into my molten puddle if I can help it. The resulting weld has this rainbow sheen to it that's really pretty. I've done some research on the mechanical soundness of using stainless as a filler, and in really critical, tight-tolerance scenarios (high pressure pipe, airplane fuselages etc), it would certainly be a no-no, but for something like a railing using large tubing with relatively large weld area it's more than adequate. The rod I'm using costs about three times as much as the standard ER70s-2 mild steel rod, but I go through rod so slowly that it's of no consequence. I estimate that I spent less than two dollars on filler rod on these four railings. Compare that to maybe $20 worth of wear on cutting tools, $30 on abrasives. Handrail brackets are an area where a little bit of creative freedom can be applied. These are designed to give optimal hand-clearance characteristics. Behold, the bicep flex bracket: 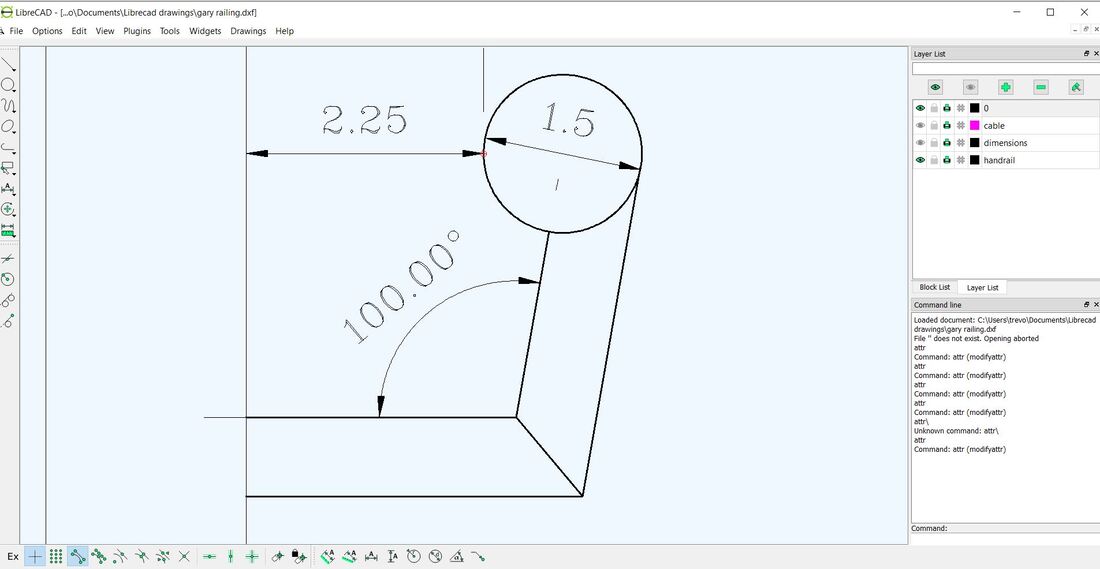 The offset miter allows one's fingers to wrap more fully around the handrail, and the obtuse angle keeps the sharp corner tucked under the rail and away from people's clothing. 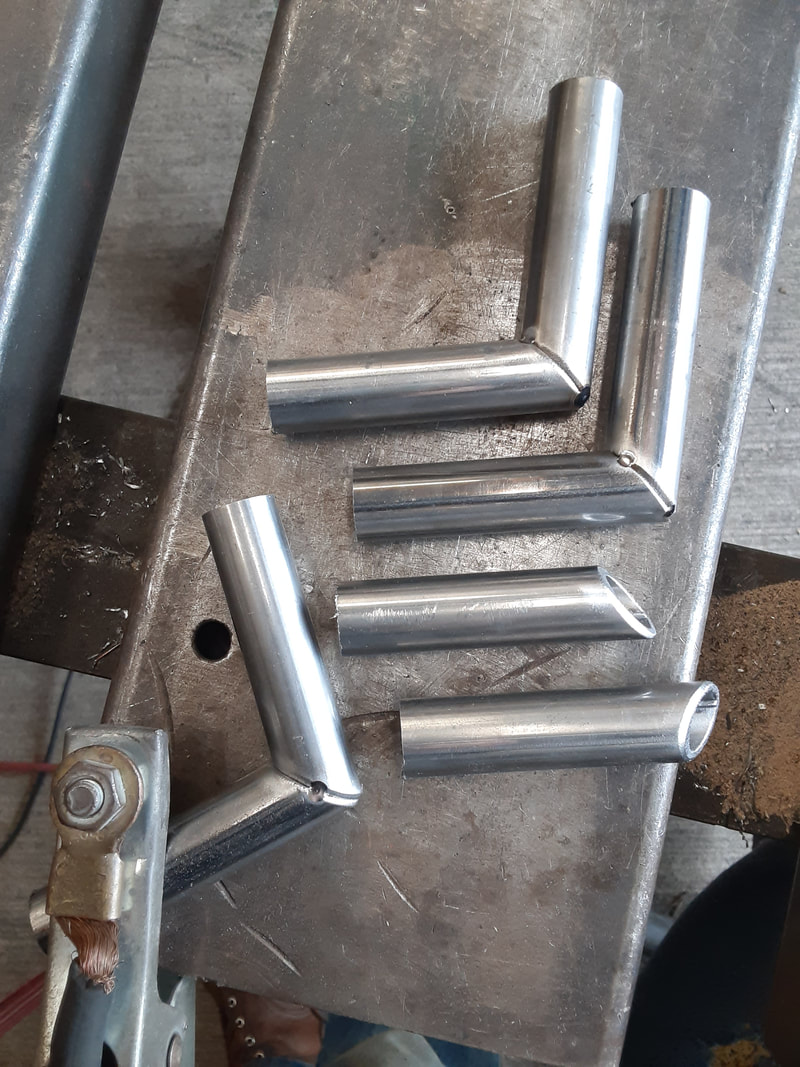  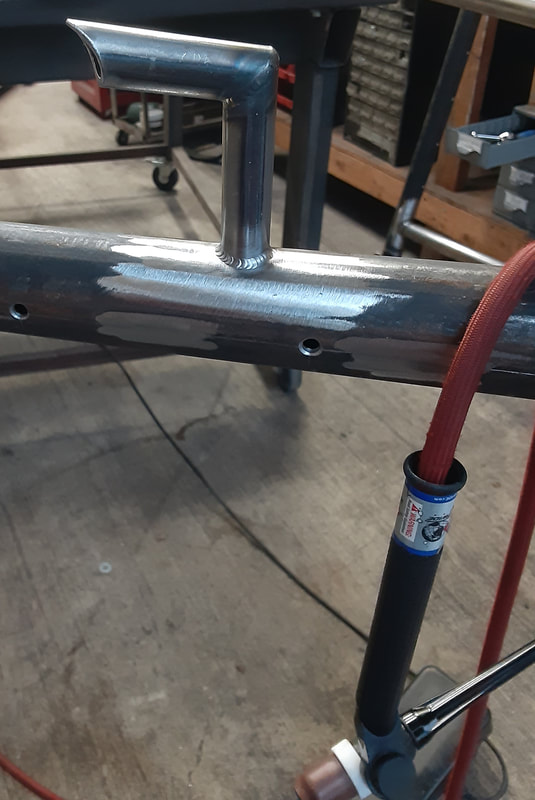 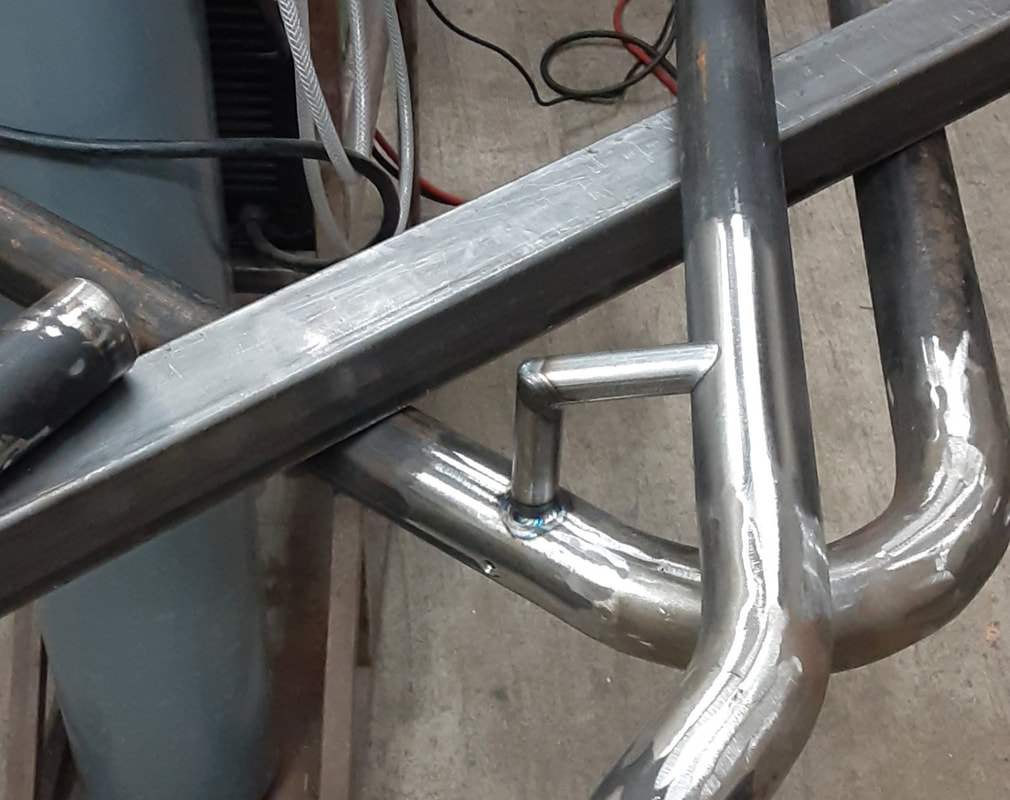  In other news, the bike from the previous blog post got powder-coated up all sparkly: 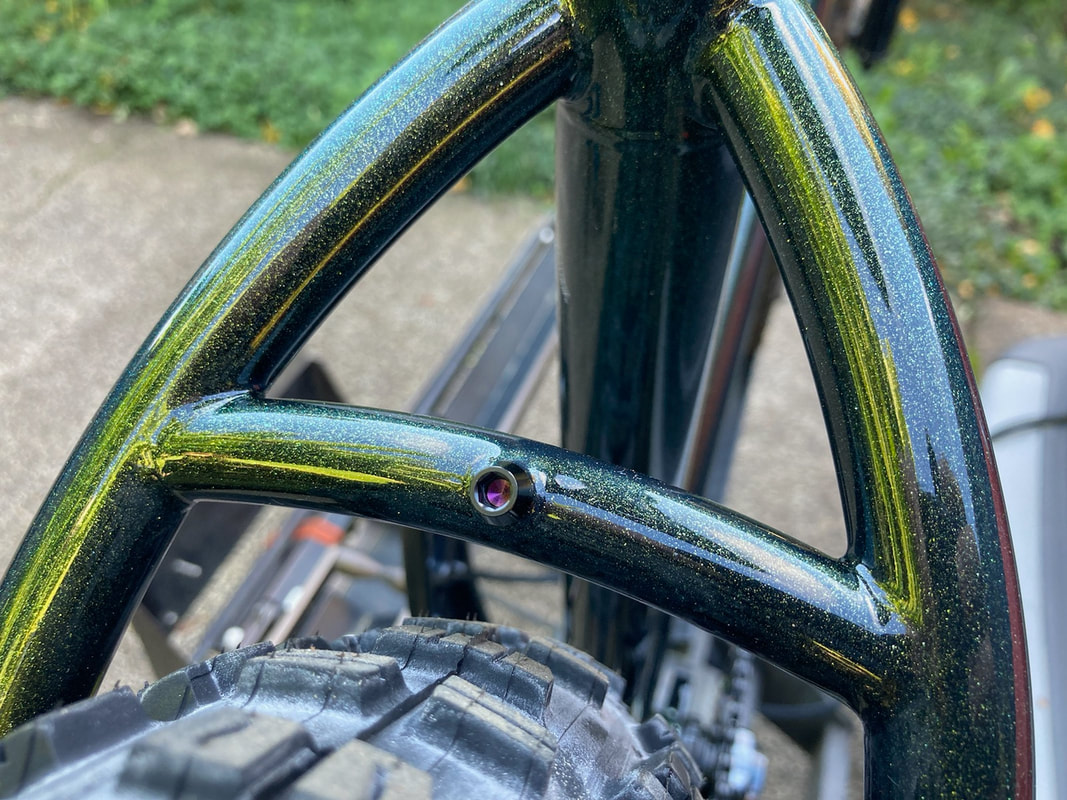 Had a quick trailer repair project for a local farmer. The tailgate ramp's hinges were rusting off; just replaced them with some "bullet" hinges. I went into that local place here in Corvallis that's called "Wood and Hinge" and asked if they stocked weld-on hinges with grease fittings. Apparently, they're not actually a hinge store. 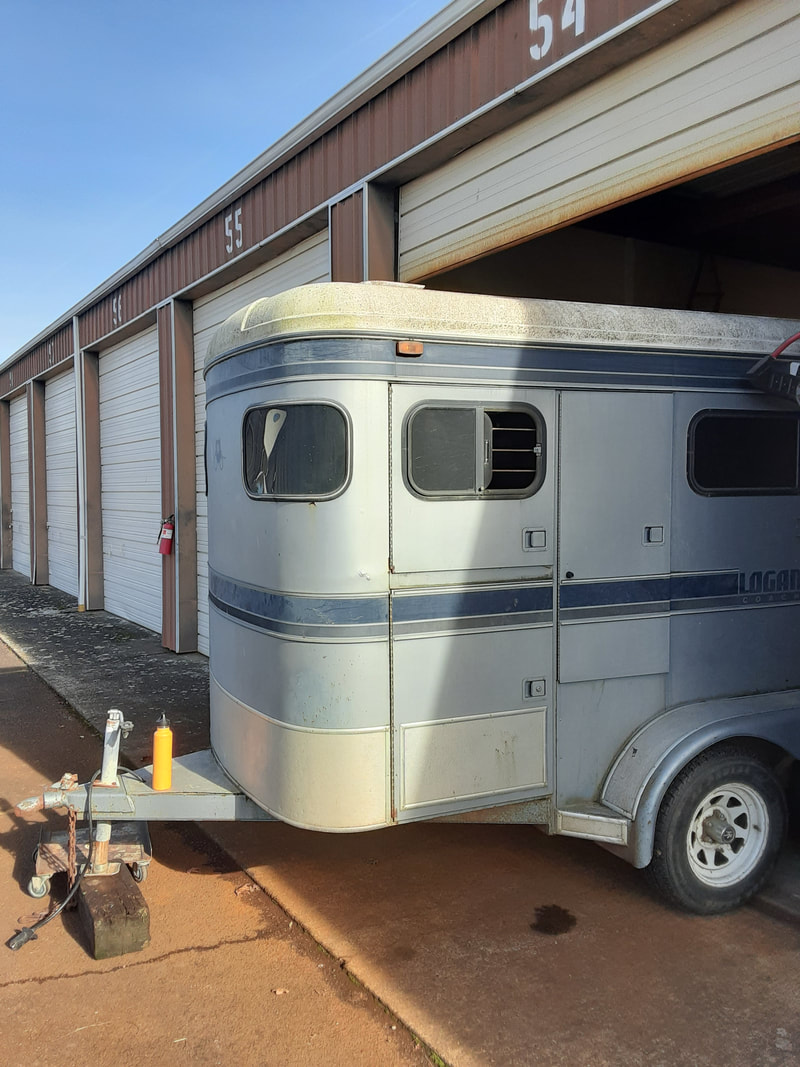 I'm trying to get out of the trailer work business, because I tend to end up with a sore back and a bad attitude afterward. I have a hard time turning down people who genuinely need help though. And I don't know the contact of any of my competitors, though I suspect a quick internet search would return such info. I am interested to meet my "competitors". I turn down a fair number of project proposals, and it would be nice to have someone to refer them to. I don't see it as losing customers, I see it as helping them. I bet the local fabricators could do some pretty cool collaborations if they shared some creative interests. I suspect most of them are busy working! In other news, I now accept credit cards for a 3% fee. When you're enjoying your European vacation, you can think of me and all those airplane miles you racked up by spending money on cool metal projects.  Lightweight roof frame for my buddy Jeff's cob oven: 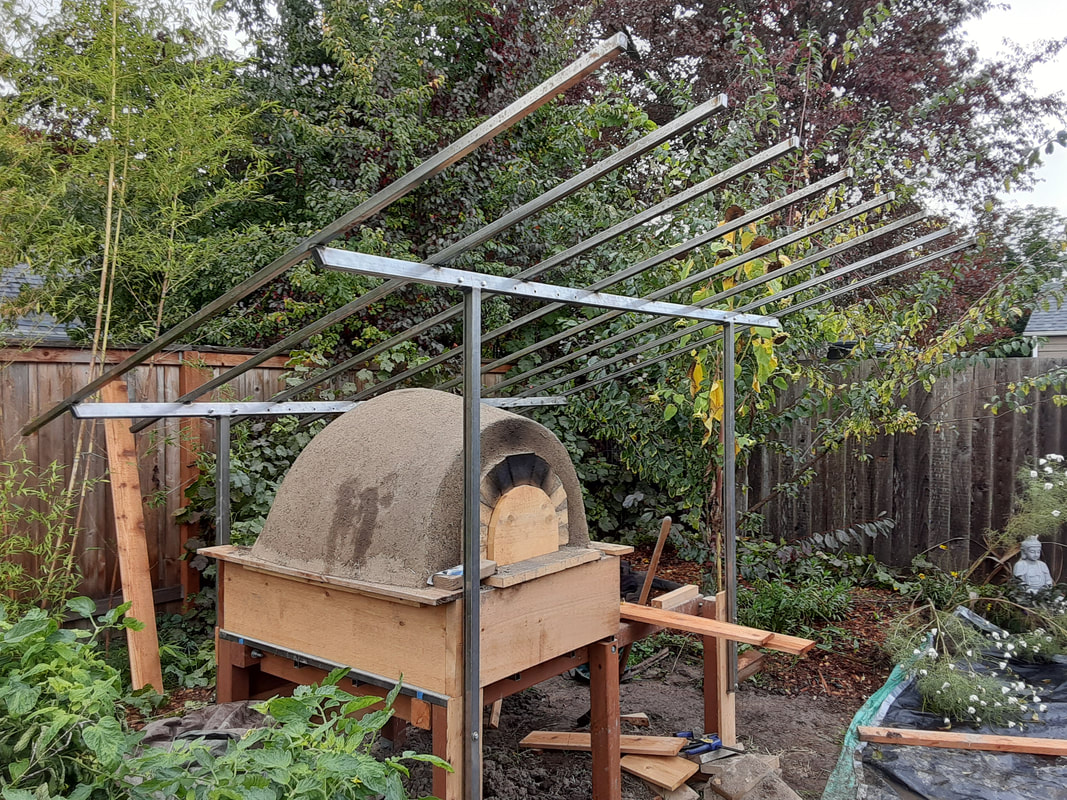 Transporting it was slightly sketchy, as it's about 9' square. I took backroads. 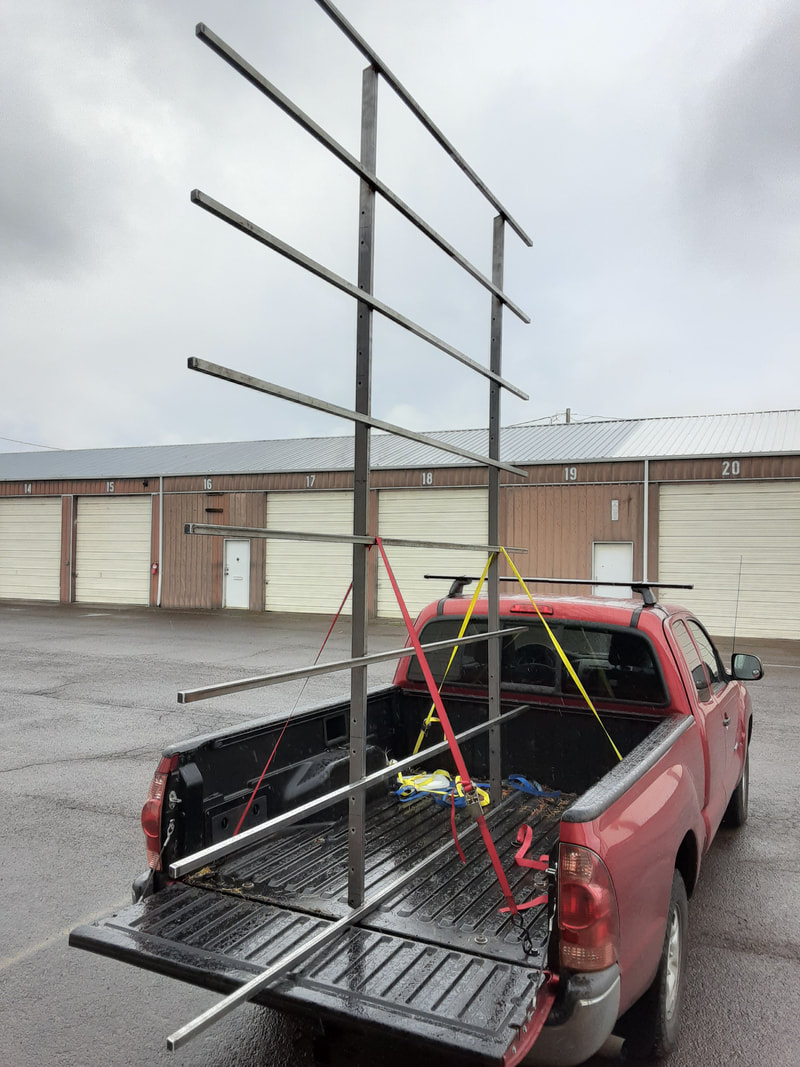 Some mesh steps and matching railings for this house in the woods. The mesh allows gravel stuck to people's shoes to fall through. 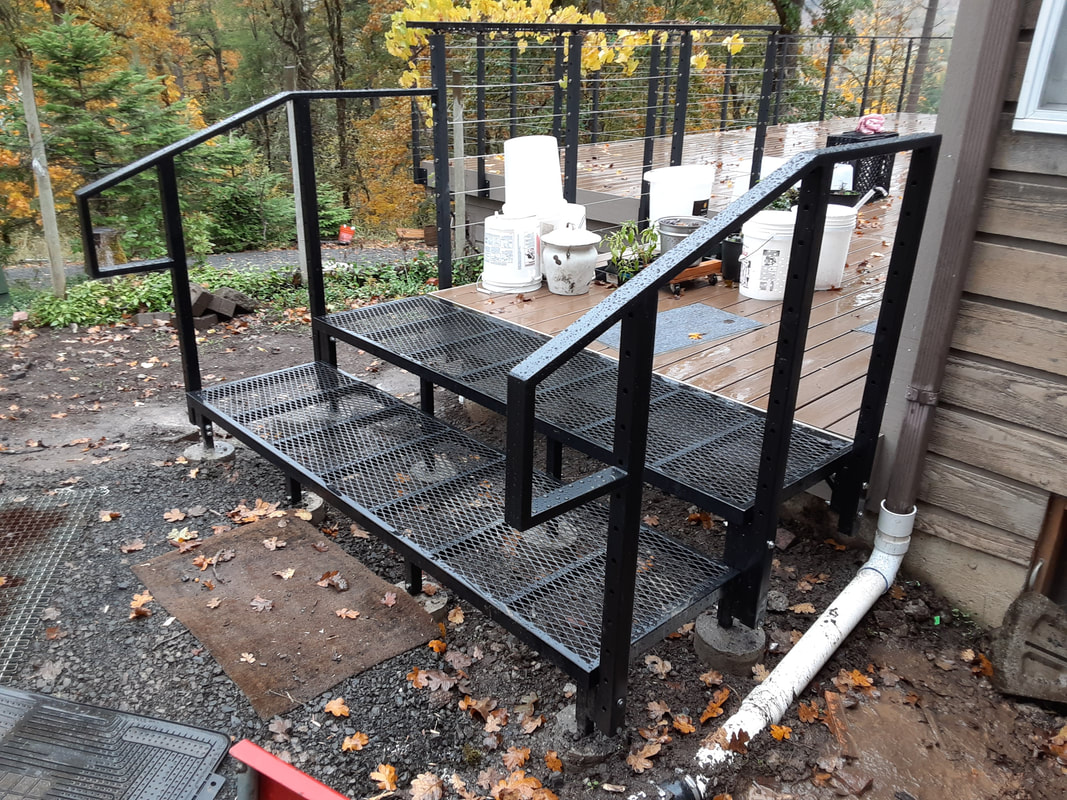 Same house, this is a mesh grate under an outdoor showerhead that allows water to drain through. 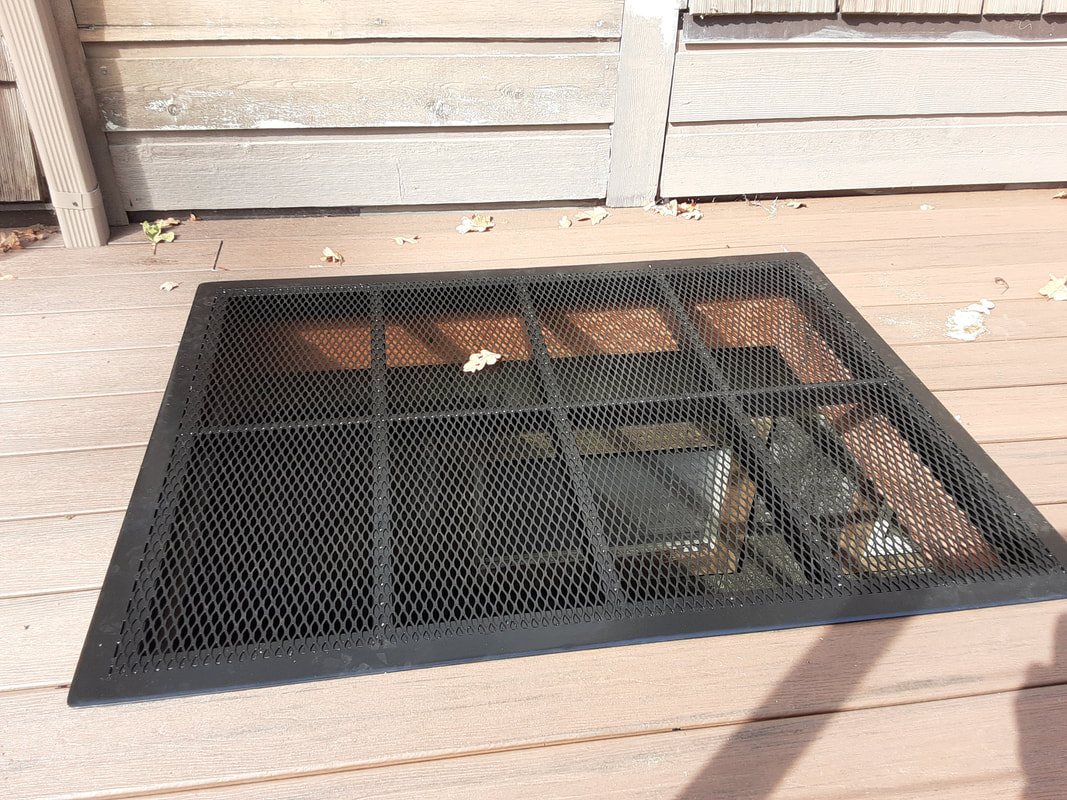 Putting an ISCG mount on Nathan's frame. He runs a chainring protector/bash guard thing that only uses the lower two holes of the ISCG bolt pattern. Since this bike has a chainstay yoke, I made the mount in two pieces and silver brazed them to his bottom bracket. 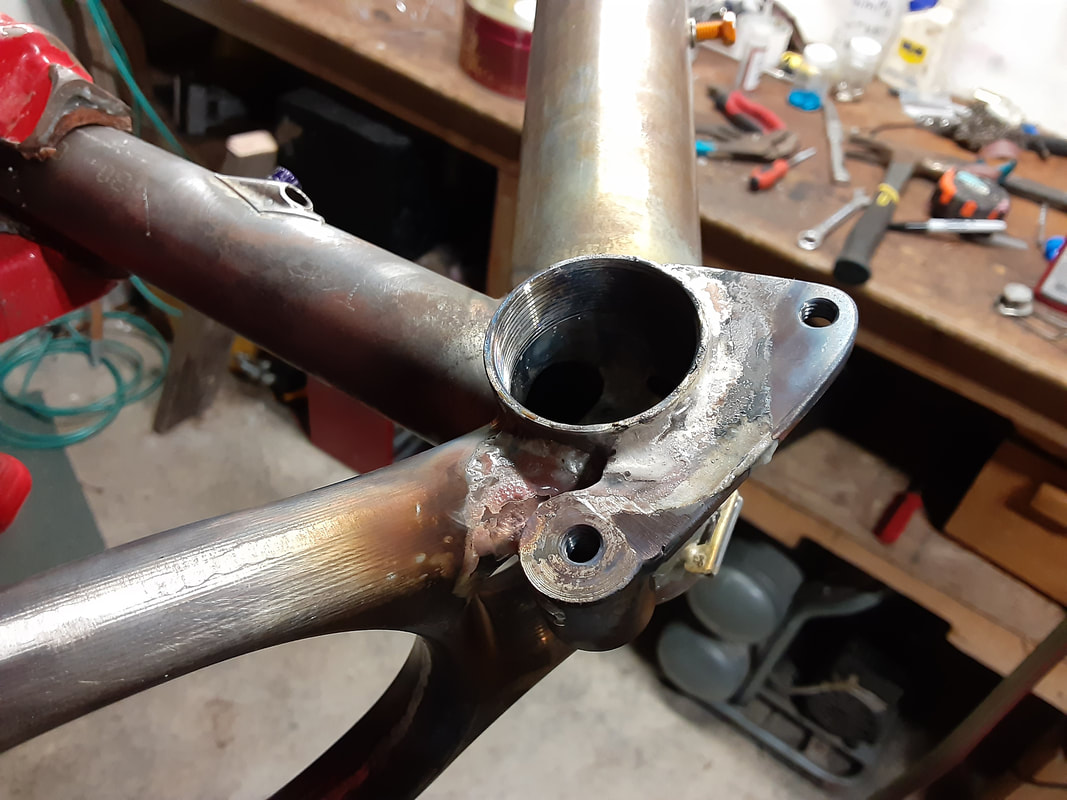 The cylindrical portion gets brazed to the underside of the chainstay yoke. 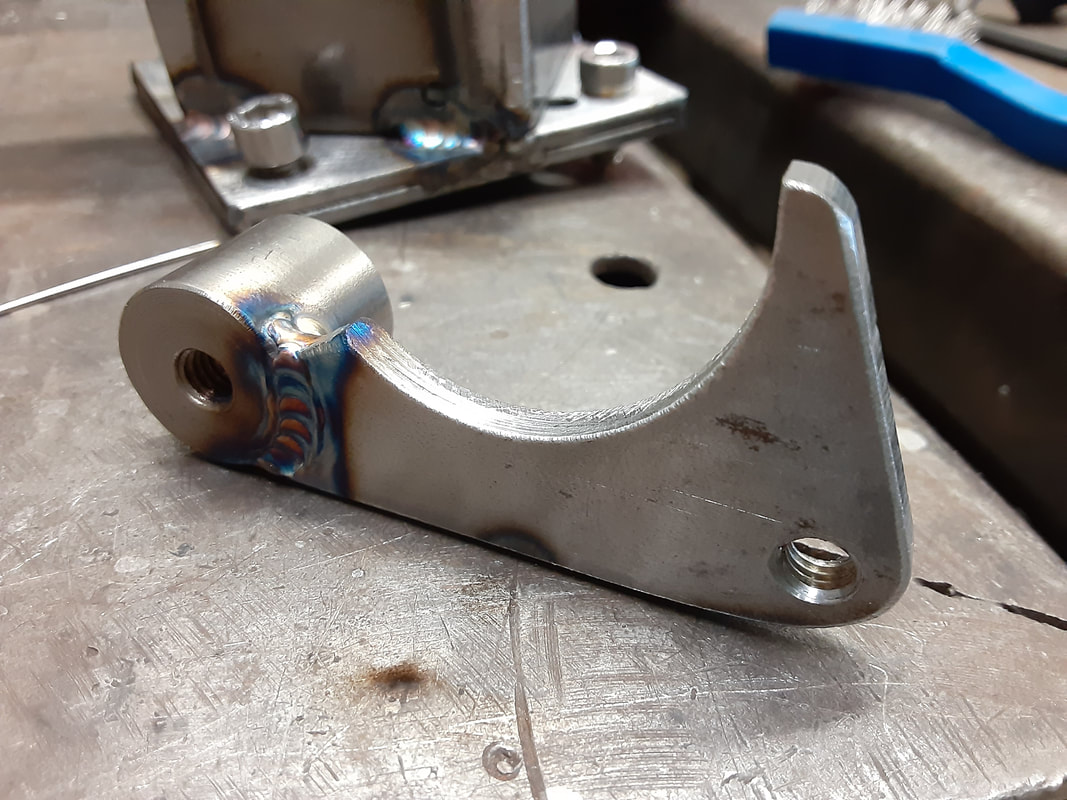 The bash guard is adjustable to some degree, so exact alignment of the ISCG mount is not super critical, but I made this fixture to align the bolt pattern properly with reference to the rear axle:  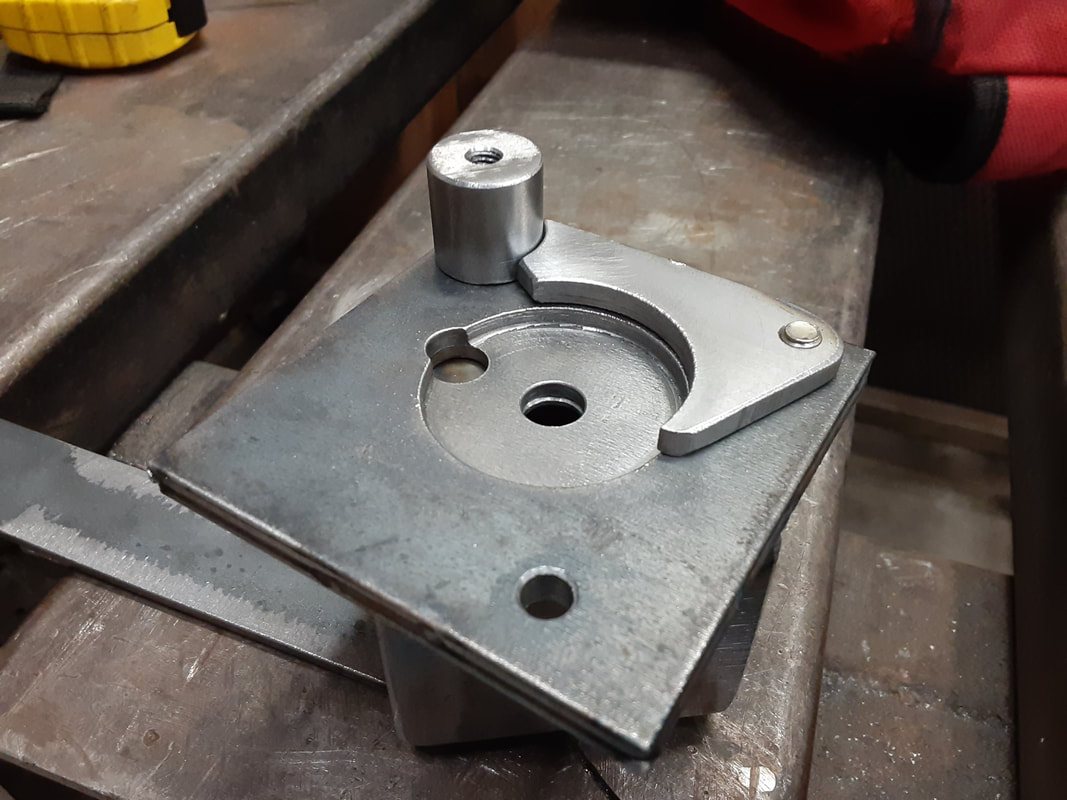 It's been busy. Not in a bad way. This owl came to check out the field mouse scene by my shop the other night:  Got some interesting stuff in the works. For now, here's a photodump with some brief captions: Decorative grille for burglary prevention:  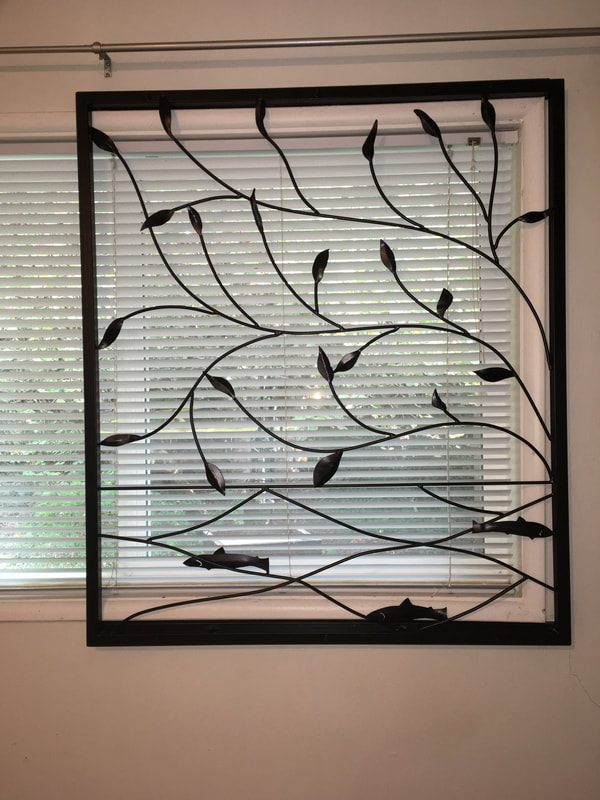 Mitering the seat tube notch on bike 19 for my buddy Nathan: 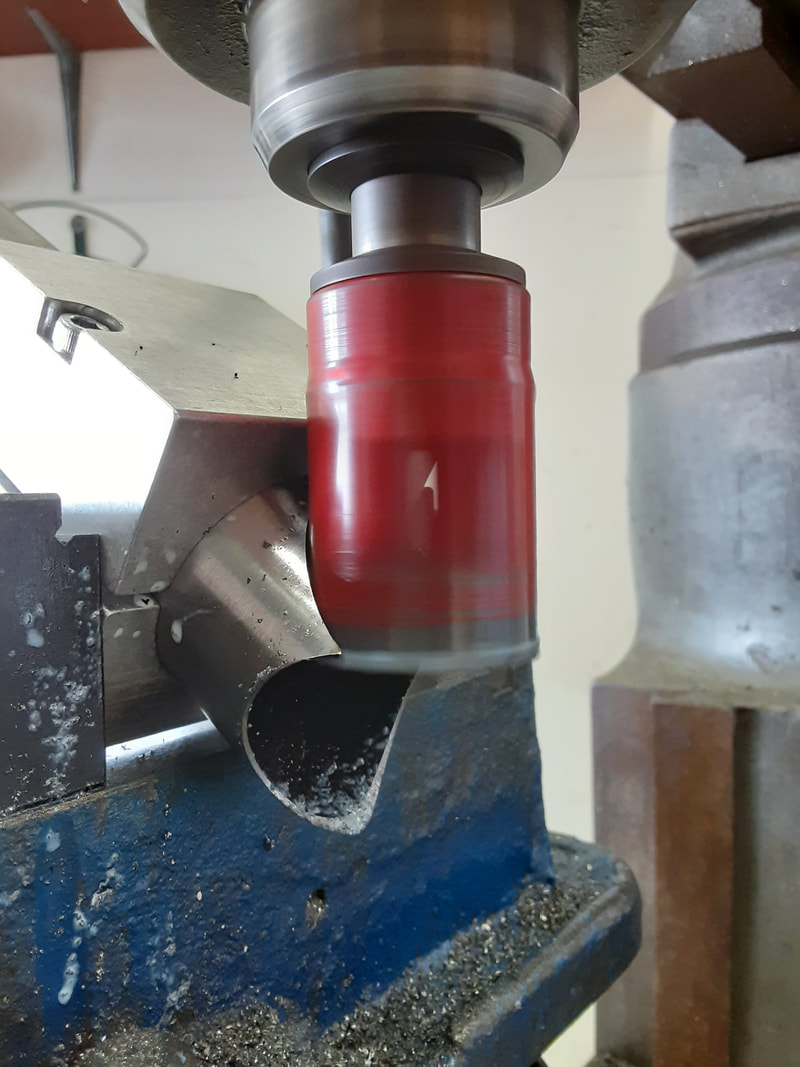 The transverse holes are for barrel nuts to mount the disc caliper. I only like seatstay mounting calipers if the bike is never going to need a rack or full coverage fenders. Mounting on the chainstay requires a different design of dropout that raises the seatstay up and out of the way of the caliper. Not a problem, just different. 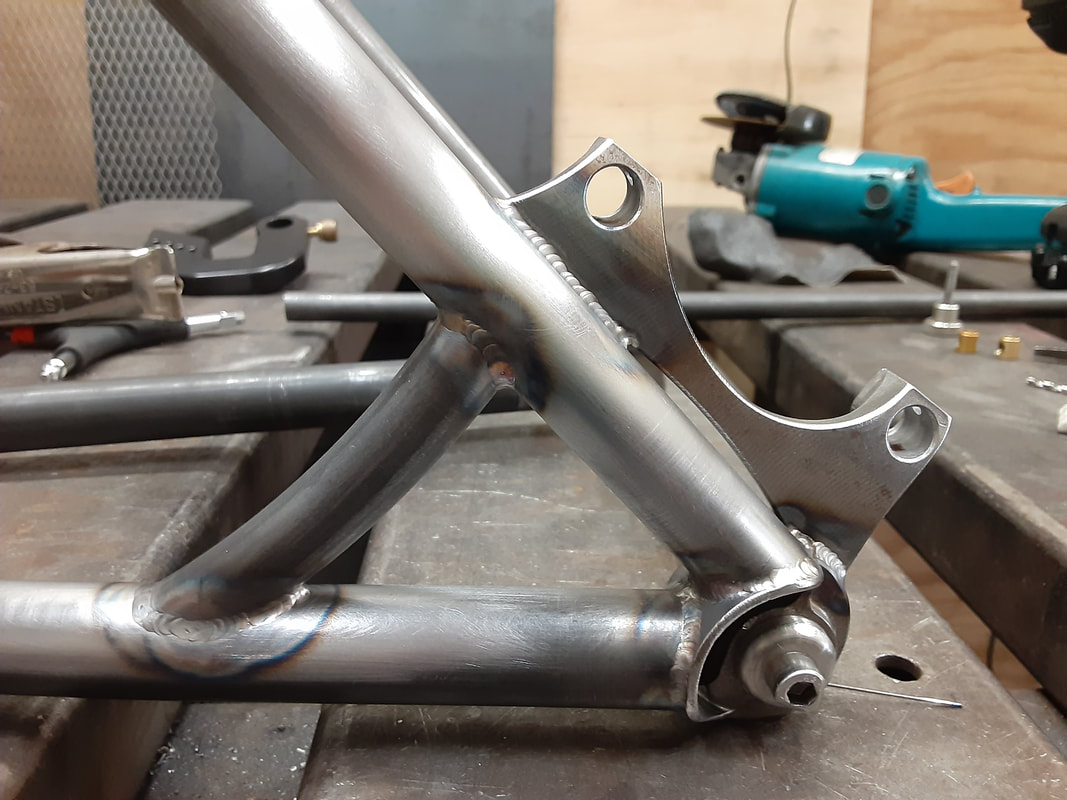 Clearance for 29 x 3.0" tires. We used a 157mm rear axle spacing for extra chainring/tire clearance: 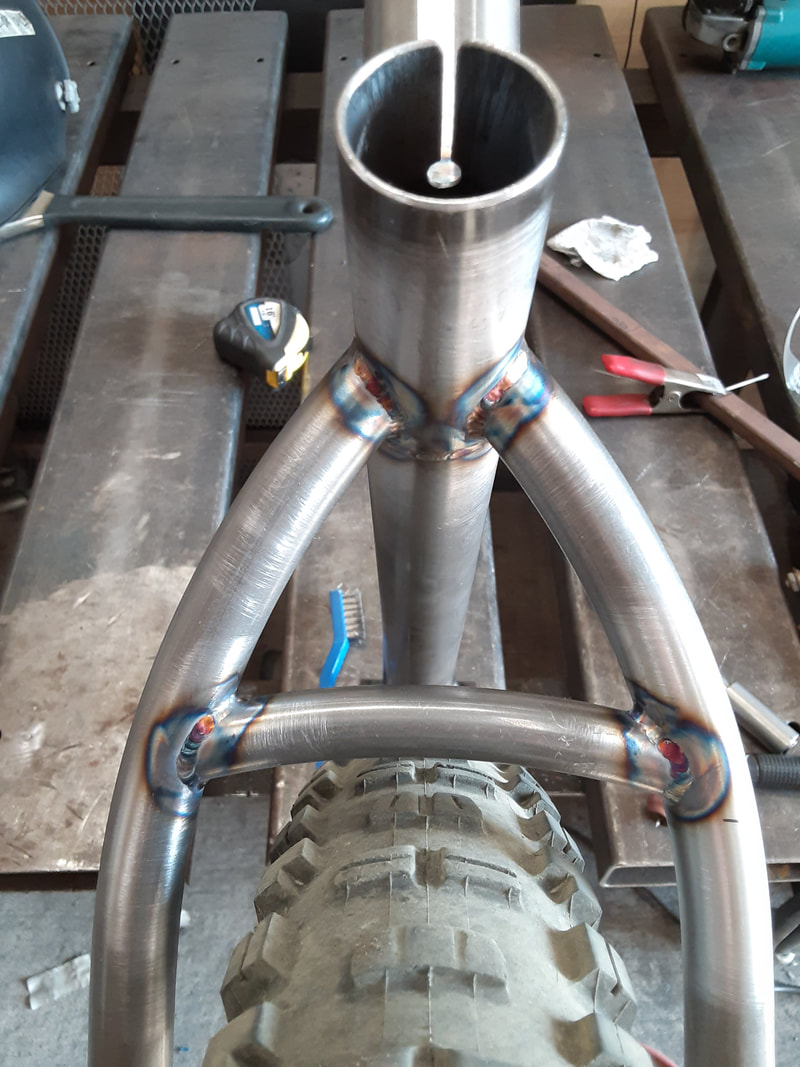 Not a great picture, but this is a height adjuster for a bike repair stand that slides up and down on a 3" square post. For the uppy-downy part, I bought a 12" piece of 3.5" square tube from McMaster ($24) and welded nuts to it. I also glued in some HDPE (milk jug material) inside to make the sliding action smoother. The tightening screws are made from a piece of 7/8" allthread I had lying around welded to a 1" tube t-handle. Nice big threads which don't mind being reefed on. In theory, this kind of stand could be used with a wooden post, as long as it was securely affixed to the floor and ceiling. Mine is a 3" square tube welded to a flange, which is then bolted to the concrete floor. Very solid relative to what's available from Park et al. 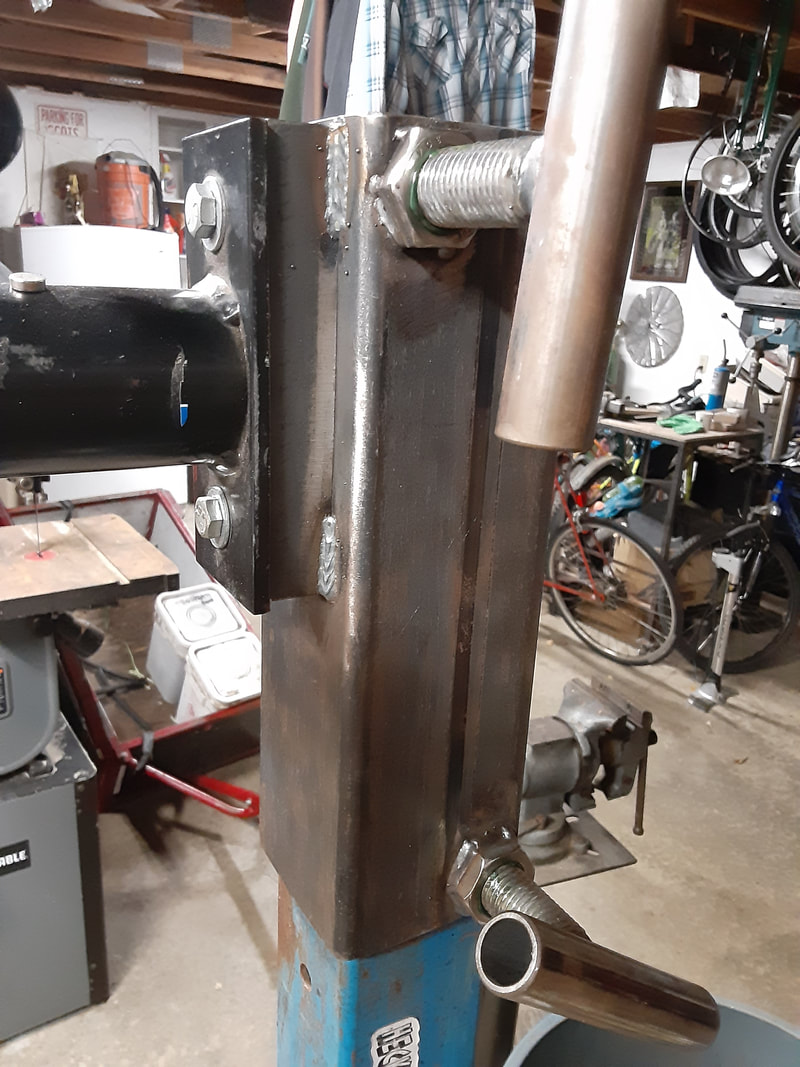 Modular canoe rack. Can be bolted to a flatbed trailer. There are some cross-members not shown in this photo: 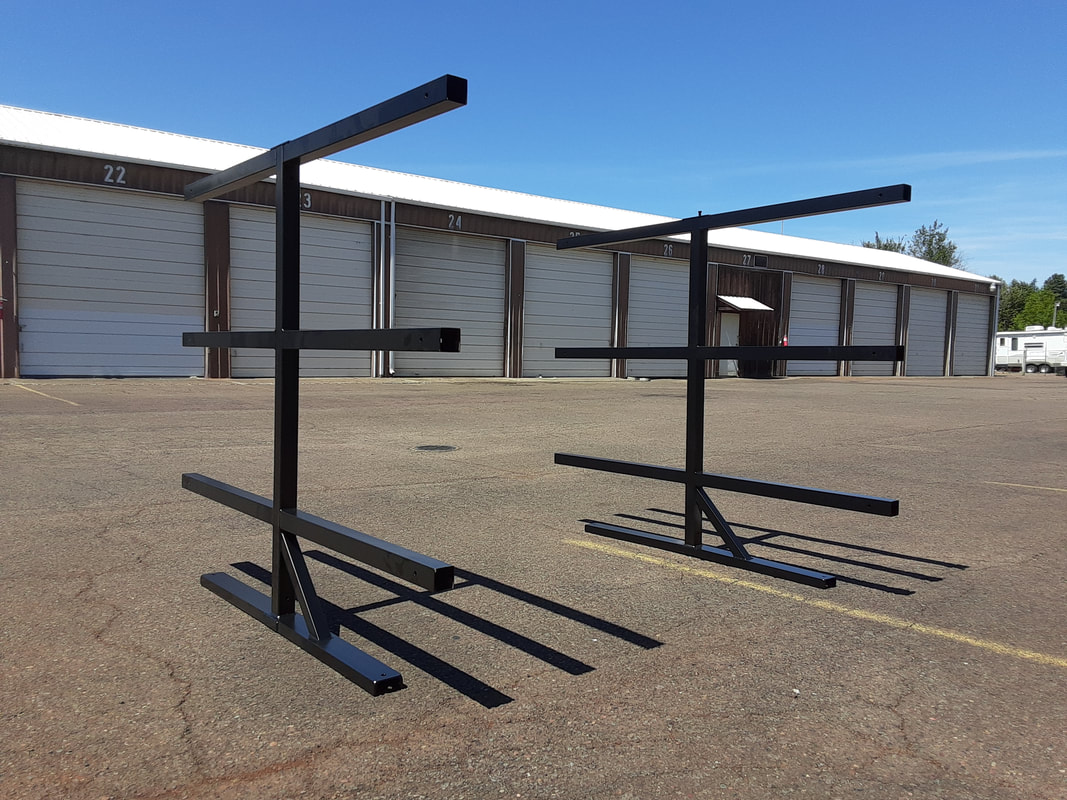 Six lovely canoes. I made two of these racks, and was just asked for more. Perhaps I should make them four levels instead of three. 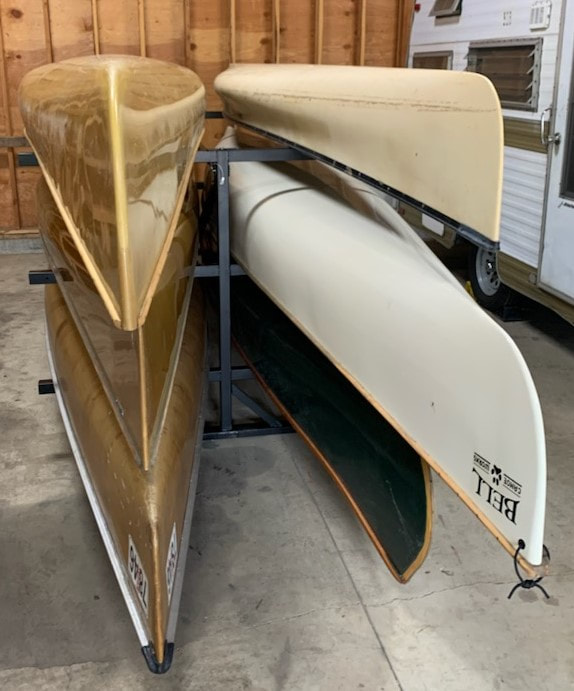 |
 RSS Feed